ACL Considerations
![]() Before you start to develop any ACLs, consider the following basic rules:
Before you start to develop any ACLs, consider the following basic rules:
-
 Base your ACLs on your security policy: Unless you anchor the ACL in a comprehensive security policy, you cannot be certain that it will effectively control access in the way that access needs to be controlled.
 -
 Write it out: Never sit down at a router and start to develop an ACL without first spending some time in design. The best ACL developers suggest that you write out a list of things that you want the ACL to accomplish. Start with something as simple as “This ACL must block all Simple Network Management Protocol (SNMP) access to the router except for the SNMP host at 16.1.1.15.”
 -
 Set up a development system: Whether you use your laptop PC or a dedicated server, you need a place to develop and store your ACLs. Word processors or text editors of any kind are suitable, as long as you can save the files in ASCII text format. Build a library of your most commonly used ACLs and use them as sources for new files. ACLs can be pasted into the router running configuration (requiring console or Telnet access) or can be stored in a router configuration file. The system that you choose should support TFTP to make it easy to transfer any resulting configuration files to the router.
Note  Hackers love to gain access to router configuration development systems or TFTP servers that store ACLs. A hacker can discover a lot about your network from looking at these easily read text files. For this reason, it is imperative that the system where you choose to develop and store your router files be a secure system.
 -
 Test: If possible, test your ACLs in a secure environment before placing them into production. Testing is a commonsense approach to any router configuration changes. Most enterprises maintain their own network test beds. Although testing might appear to be an unnecessary cost, over time it can save time and money.
![]() You should consider several caveats when working with ACLs:
You should consider several caveats when working with ACLs:
-
 Implicit deny all: All Cisco ACLs end with an implicit deny all statement. Although you might not actually see this statement in your ACLs, they do exist.
 -
 Standard ACL limitation: Because standard ACLs are limited to packet filtering on only source addresses, you might need to create extended ACLs to implement your security policies.
 -
 Order of specific statements: Certain ACL statements are more specific than others are; therefore, you need to place them higher in the ACL. For example, blocking all UDP traffic at the top of the list negates the blocking of SNMP packets lower in the list. Take care that statements at the top of the ACL do not negate any statements found lower in the list.
 -
 Directional filtering: Cisco ACLs have a directional filter that determines whether they examine inbound packets (toward the interface) or outbound packets (away from the interface). Always double-check the direction of data that your ACL is filtering.
 -
 Modifying ACLs: Cisco IOS Software Release 12.2 and earlier always appends new statements to an existing ACL to the bottom of the ACL. Because of the inherent top-down statement evaluation order of ACLs, these new entries can render the ACL unusable. When a new statement does render the ACL unusable, you must create a new ACL with the correct statement ordering, delete the old ACL, and assign the new ACL to the router interface. If you are using Cisco IOS Software Release 12.3 and later, you can use sequence numbers to ensure that you are adding a new statement into the ACL in the correct location. The ACL is processed top-down based on the sequence numbers of the statements (lowest to highest).
 -
 Special packets: Router-generated packets, such as routing table updates, are not subject to outbound ACL statements applied to interfaces on the source router. If your security policy requires filtering these types of packets, inbound ACLs on adjacent routers or other router filter mechanisms using ACLs must do the filtering task.
 -
 Extended ACL placement: If you use extended ACLs on routers too far from the source that you need to filter, packets flowing to other routers and interfaces might be adversely affected. Always consider placing extended ACLs on routers as close as possible to the source that you are filtering.
 -
 Standard ACL placement: Because standard ACLs filter packets based on the source address, placing these ACLs too close to the source can adversely affect packets destined to other destinations. Always place standard ACLs as close to the destination as possible.
Configuring ACLs Using SDM
![]() Rules define how the router will respond to a particular kind of traffic. Using Cisco Security Device Manager (SDM), you can create access rules that cause the router to block certain types of traffic while permitting other types, create NAT rules that define the traffic that is to receive address translation, and create IPsec rules that specify which traffic is to be encrypted.
Rules define how the router will respond to a particular kind of traffic. Using Cisco Security Device Manager (SDM), you can create access rules that cause the router to block certain types of traffic while permitting other types, create NAT rules that define the traffic that is to receive address translation, and create IPsec rules that specify which traffic is to be encrypted.
![]() Cisco SDM also provides default rules that are used in guided configurations, and that you can examine and use when you create your own access rules. It also allows you to view rules that were not created using Cisco SDM, called external rules, and rules with syntax that Cisco SDM does not support, called unsupported rules.
Cisco SDM also provides default rules that are used in guided configurations, and that you can examine and use when you create your own access rules. It also allows you to view rules that were not created using Cisco SDM, called external rules, and rules with syntax that Cisco SDM does not support, called unsupported rules.
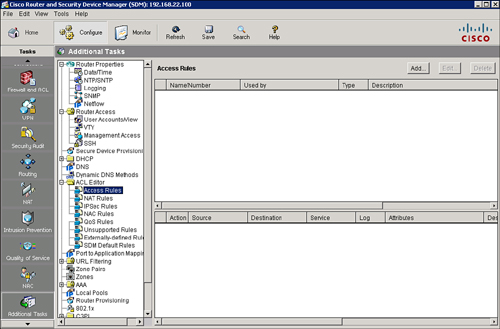
![]() Use the SDM Rules (ACL) Summary window to view a summary of the rules in the router configuration and to navigate to other windows to create, edit, or delete rules. To access this window, choose Configure > Additional Tasks > ACL Editor, as shown in Figure 3-22.
Use the SDM Rules (ACL) Summary window to view a summary of the rules in the router configuration and to navigate to other windows to create, edit, or delete rules. To access this window, choose Configure > Additional Tasks > ACL Editor, as shown in Figure 3-22.
![]() Cisco SDM enables you to manage the following types of rules:
Cisco SDM enables you to manage the following types of rules:
-
 Access rules: These rules govern the traffic that can enter and leave the network. You can apply access rules to router interfaces and to vty lines.
 -
 NAT rules: These rules determine which private IP addresses are translated into valid Internet IP addresses.
 -
 IPsec rules: These rules determine which traffic is encrypted on secure connections.
 -
 NAC rules: These rules specify which IP addresses should be admitted to the network or blocked from the network. More precisely, it determines what access is granted to devices exempted from posture validation such as IP phones.
 -
 Firewall rules (not shown in Figure 3-22): These rules can specify source and destination addresses and whether the traffic should be permitted or denied.
 -
 QoS rules: These rules specify traffic that should belong to the quality of service (QoS) class to which the rule is associated.
 -
 Unsupported rules: These are rules that were not created using Cisco SDM and that Cisco SDM does not support. These rules are read only, and cannot be modified using Cisco SDM.
 -
 Externally Defined rules: These are rules that were not created using Cisco SDM, but that Cisco SDM supports. These rules cannot be associated with any interface using the SDM, however, they can be associated with an interface from the CLI.
 -
 Cisco SDM default rules: These rules are predefined rules that are used by Cisco SDM wizards.
 Creating Standard ACLs with Cisco SDM
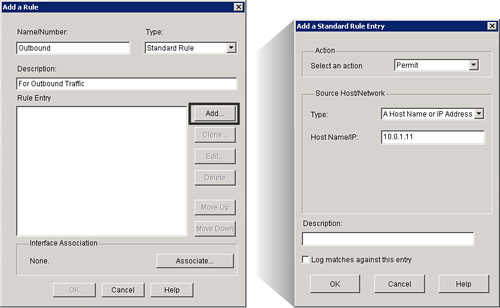
![]() Cisco SDM refers to ACLs as access rules. From Cisco SDM, you can create and apply standard rules (standard ACL) as shown in Figure 3-23.
Cisco SDM refers to ACLs as access rules. From Cisco SDM, you can create and apply standard rules (standard ACL) as shown in Figure 3-23.
![]() Follow these steps to configure a standard rule using Cisco SDM:
Follow these steps to configure a standard rule using Cisco SDM:
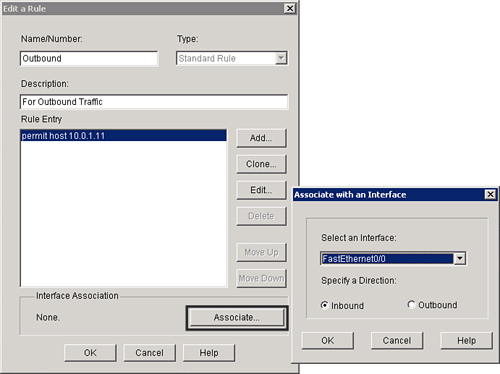
![]() After the Rule Entry list is complete, the next step is to apply the rule to an interface, as shown in Figure 3-24.
After the Rule Entry list is complete, the next step is to apply the rule to an interface, as shown in Figure 3-24.
![]() Follow these steps to apply the rule to an interface:
Follow these steps to apply the rule to an interface:
|
|
|
|
|
|
|
|
|
|
|
|
 Creating Extended ACLs with Cisco SDM
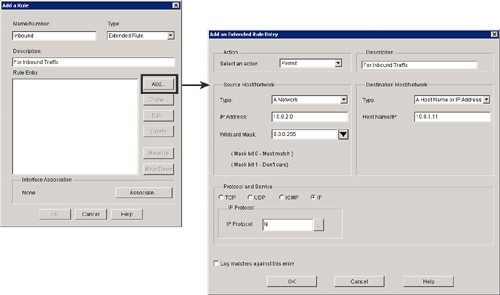
![]() From Cisco SDM, you can also create and apply extended rules (extended ACLs) as shown in Figure 3-25.
From Cisco SDM, you can also create and apply extended rules (extended ACLs) as shown in Figure 3-25.
![]() Follow these steps to configure an extended rule:
Follow these steps to configure an extended rule:
|
|
| |||
|
|
| |||
|
|
| |||
|
|
| |||
|
|
| |||
|
|
| |||
|
|
| |||
|
|
| |||
|
|
| |||
|
|
| |||
|
|
|
![]() After the Rule Entry list is complete, the next step is to apply the rule to an interface, as shown previously in Figure 3-24.
After the Rule Entry list is complete, the next step is to apply the rule to an interface, as shown previously in Figure 3-24.
Using ACLs to Permit and Deny Network Services
![]() ACLs can be used to permit or deny different network services. ACLs can be used not only to filter user traffic, but also to filter routing updates, traffic originating from a vty session, ICMP messages, and many other uses. This section shows the different uses of ACLs.
ACLs can be used to permit or deny different network services. ACLs can be used not only to filter user traffic, but also to filter routing updates, traffic originating from a vty session, ICMP messages, and many other uses. This section shows the different uses of ACLs.
 Controlling Routing Updates
![]() Cisco routers share routing table update information to provide directions on where to route traffic. ACLs can be used to limit which routes a router accepts (takes in) or advertises (sends out) to its counterparts.
Cisco routers share routing table update information to provide directions on where to route traffic. ACLs can be used to limit which routes a router accepts (takes in) or advertises (sends out) to its counterparts.
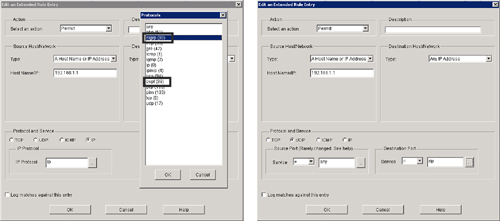
![]() Figure 3-26 shows examples of routing protocol entries using SDM. On the left, you can see an example of how to filter Open Shortest Path First (OSPF) or Enhanced Interior Gateway Routing Protocol (EIGRP). On the right, you can see how to filter Routing Information Protocol (RIP).
Figure 3-26 shows examples of routing protocol entries using SDM. On the left, you can see an example of how to filter Open Shortest Path First (OSPF) or Enhanced Interior Gateway Routing Protocol (EIGRP). On the right, you can see how to filter Routing Information Protocol (RIP).
![]() Example 3-7 shows an extended IP ACL that accepts only OSPF, EIGRP, and RIP traffic sourced from the IP address 192.168.1.1.
Example 3-7 shows an extended IP ACL that accepts only OSPF, EIGRP, and RIP traffic sourced from the IP address 192.168.1.1.
r1(config)# access-list 120 permit émigré host 192.168.1.1 any
r1(config)# access-list 120 permit ospf host 192.168.1.1 any
r1(config)# access-list 120 permit udp host 192.168.1.1 any eq rip
r1(config)# interface fa0/2
r1(config-if)# ip access-group 120 in
 IP Address Spoof Mitigation: Inbound
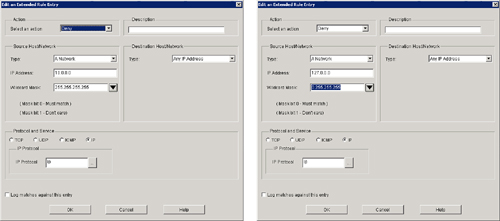
![]() Generally, you should not allow any IP packets containing the source address of any internal hosts or networks inbound to a private network. Figure 3-27 shows how SDM can be used to configure an antispoofing rule detailed in Example 3-8.
Generally, you should not allow any IP packets containing the source address of any internal hosts or networks inbound to a private network. Figure 3-27 shows how SDM can be used to configure an antispoofing rule detailed in Example 3-8.
![]() Example 3-8 shows ACL 150 for router r1. In this example, the ACL denies all packets containing the following IP addresses in their source field:
Example 3-8 shows ACL 150 for router r1. In this example, the ACL denies all packets containing the following IP addresses in their source field:
-
 Any local host addresses (127.0.0.0/8)
 -
 Any reserved private addresses (RFC 1918, Address Allocation for Private Internets)
 -
 Any addresses in the IP multicast address range (224.0.0.0/4)
r1(config)# access-list 150 deny ip 0.0.0.0 0.255.255.255 any
r1(config)# access-list 150 deny ip 10.0.0.0 0.255.255.255 any
r1(config)# access-list 150 deny ip 127.0.0.0 0.255.255.255 any
r1(config)# access-list 150 deny ip 169.0.0.0 0.255.255.255 any
r1(config)# access-list 150 deny ip 172.16.0.0 0.15.255.255 any
r1(config)# access-list 150 deny ip 192.168.0.0 0.0.255.255 any
r1(config)# access-list 150 deny ip 224.0.0.0 15.255.255.255 any
r1(config)# access-list 150 deny ip host 255.255.255.255 any
r1(config)# access-list 150 permit any any
 IP Address Spoof Mitigation: Outbound
![]() Generally, you should not allow any outbound IP packets with a source address other than a valid IP address of the internal network.
Generally, you should not allow any outbound IP packets with a source address other than a valid IP address of the internal network.
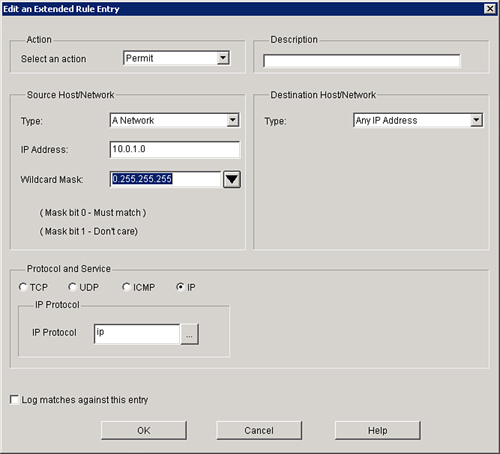
![]() Figure 3-28 shows a partial configuration using SDM of an inbound spoofing protection.
Figure 3-28 shows a partial configuration using SDM of an inbound spoofing protection.
![]() Example 3-9 shows ACL 105 for router r1. This ACL permits only those packets that contain source addresses from the 10.0.1.0/24 network and denies all others.
Example 3-9 shows ACL 105 for router r1. This ACL permits only those packets that contain source addresses from the 10.0.1.0/24 network and denies all others.
r1(config)# access-list 105 permit ip 10.0.1.0 0.0.0.255 any
| Note |
|
 ICMP Filtering
![]() Hackers use several ICMP message types to attack networks. Unfortunately, there are many legitimate ICMP messages as well. Various management applications use ICMP messages to gather information. Network management uses ICMP messages automatically generated by the router.
Hackers use several ICMP message types to attack networks. Unfortunately, there are many legitimate ICMP messages as well. Various management applications use ICMP messages to gather information. Network management uses ICMP messages automatically generated by the router.
Filtering Inbound ICMP Packets
![]() Hackers can use ICMP echo packets to discover subnets and hosts on the protected network and to generate DoS floods. Hackers can use ICMP redirect messages to alter host routing tables. Both ICMP echo and redirect messages should be blocked inbound by the router.
Hackers can use ICMP echo packets to discover subnets and hosts on the protected network and to generate DoS floods. Hackers can use ICMP redirect messages to alter host routing tables. Both ICMP echo and redirect messages should be blocked inbound by the router.
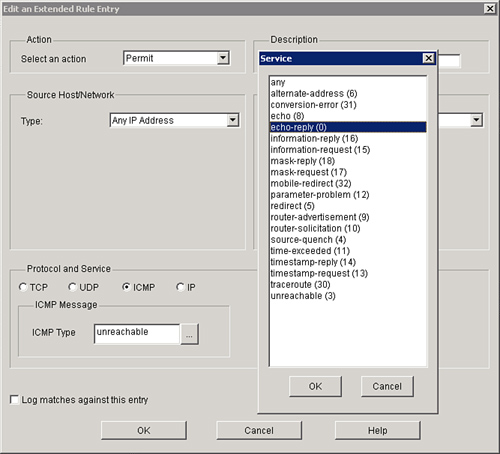
![]() SDM can be used to filter ICMP messages, as shown in Figure 3-29.
SDM can be used to filter ICMP messages, as shown in Figure 3-29.
![]() The ACL statement shown in Example 3-10 permits necessary ICMP traffic and blocks all the others. The first line in access-list 112 ensures that inbound replies to our outbound echo requests (pings) will be allowed to come in. The second line in access-list 112 ensures that source-quench messages originating from a host located on the outside are allowed to come in to notify our inside host to reduce the pace at which it is sending packets to that outside host. The third line in access-list 112 ensures that ICMP messages originating from the outside and having for the destination an inside host, and bearing the news “unreachable,” such as port unreachable, network unreachable, host reachable, and the like, are allowed to reach that inside host.
The ACL statement shown in Example 3-10 permits necessary ICMP traffic and blocks all the others. The first line in access-list 112 ensures that inbound replies to our outbound echo requests (pings) will be allowed to come in. The second line in access-list 112 ensures that source-quench messages originating from a host located on the outside are allowed to come in to notify our inside host to reduce the pace at which it is sending packets to that outside host. The third line in access-list 112 ensures that ICMP messages originating from the outside and having for the destination an inside host, and bearing the news “unreachable,” such as port unreachable, network unreachable, host reachable, and the like, are allowed to reach that inside host.
r1(config)# access-list 112 permit icmp any any echo-reply
r1(config)# access-list 112 permit icmp any any source-quench
r1(config)# access-list 112 permit icmp any any unreachable
r1(config)# access-list 112 deny icmp any any
Filtering Outbound ICMP Packets
![]() Several ICMP messages are required for proper network operation and should be allowed outbound:
Several ICMP messages are required for proper network operation and should be allowed outbound:
-
 Echo: Allows users to ping external hosts
 -
 Parameter problem: Informs the host of packet header problems.
 -
 Packet too big: Required for packet maximum transmission unit (MTU) discovery
 -
 Source quench: Throttles down traffic when necessary
![]() As a rule, you should block all other ICMP message types outbound. The ACL in Example 3-11 permits all of these ICMP messages outbound while denying all others.
As a rule, you should block all other ICMP message types outbound. The ACL in Example 3-11 permits all of these ICMP messages outbound while denying all others.
r1(config)# access-list 114 permit icmp 16.2.1.0 0.0.0.255 any echo
r1(config)# access-list 114 permit icmp 16.2.1.0 0.0.0.255 any packet-too-big
r1(config)# access-list 114 permit icmp 16.2.1.0 0.0.0.255 any source-quench
| Note |
|
 Permitting Common Services
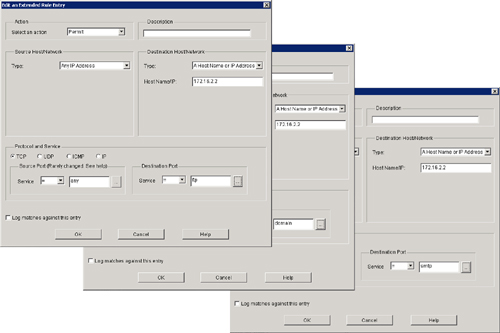
![]() DNS, SMTP, and FTP are common services that you often have to allow through a firewall. Figure 3-30 and Example 3-12 show how to configure these three services.
DNS, SMTP, and FTP are common services that you often have to allow through a firewall. Figure 3-30 and Example 3-12 show how to configure these three services.
r1(config)# access-list 122 permit udp any host 172.16.2.2 eq domain
r1(config)# access-list 122 permit tcp any host 172.16.2.2 eq smtp
r1(config)# access-list 122 permit tcp any host 172.16.2.2 eq ftp
 Permitting Router Service Traffic
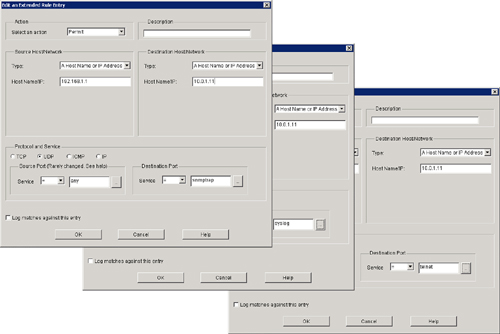
![]() It is also quite common that you will need to configure a firewall to permit protocols that are necessary to administer a router. For example, it might be necessary to allow traffic through an internal router that permits router maintenance traffic from an outside device. Telnet, SSH, syslog, and SNMP are examples of services that a router may need to include. Figure 3-31 and Example 3-13 show how to allow these services.
It is also quite common that you will need to configure a firewall to permit protocols that are necessary to administer a router. For example, it might be necessary to allow traffic through an internal router that permits router maintenance traffic from an outside device. Telnet, SSH, syslog, and SNMP are examples of services that a router may need to include. Figure 3-31 and Example 3-13 show how to allow these services.
r1(config)# access-list 180 permit tcp host 192.168.1.1 host 10.0.1.11 eq telnet
r1(config)# access-list 180 permit tcp host 192.168.1.1 host 10.0.1.11 eq 22
r1(config)# access-list 180 permit udp host 192.168.1.1 host 10.0.1.11 eq syslog
r1(config)# access-list 180 permit udp host 192.168.1.1 host 10.0.1.11 eq snmptrap
r1(config)# interface fa0/2
r1(config-if)# ip access-group 180 in
| Note |
|

0 comments
Post a Comment