ACL Fundamentals
![]() ACLs provide packet filtering for routers and firewalls to protect internal networks from the outside world. ACLs filter network traffic in both directions by controlling whether to forward or block packets at the router interfaces based on the criteria that you specify within the ACLs. ACL criteria could be the source address of the traffic, the destination address of the traffic, the upper-layer protocol, or other information. Be aware, however, that sophisticated users (hackers) can sometimes successfully evade or fool basic ACLs because not only is authentication not required, but mainly because of the inability of an ACL to track the state of a connection.
ACLs provide packet filtering for routers and firewalls to protect internal networks from the outside world. ACLs filter network traffic in both directions by controlling whether to forward or block packets at the router interfaces based on the criteria that you specify within the ACLs. ACL criteria could be the source address of the traffic, the destination address of the traffic, the upper-layer protocol, or other information. Be aware, however, that sophisticated users (hackers) can sometimes successfully evade or fool basic ACLs because not only is authentication not required, but mainly because of the inability of an ACL to track the state of a connection.
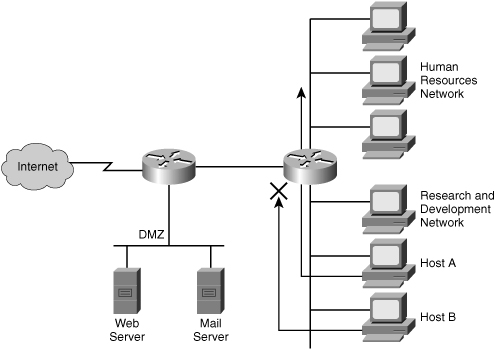
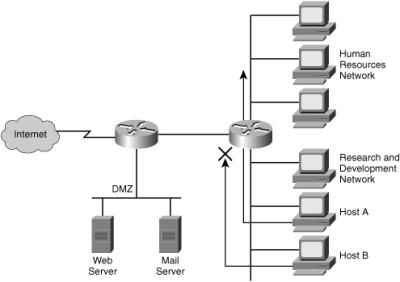
![]() ACLs provide a basic level of security for accessing your network. If you do not configure ACLs on your router, all packets passing through the router could get to all parts of your network. You can use ACLs on a router that is positioned between two parts of your network to control traffic entering or exiting a specific part of your internal network. An ACL on the router allows one host to access a part of your network and prevents another host from accessing the same area. The ACL shown in Figure 3-12 allows Host A to access the Human Resources network but prevents Host B from accessing the Human Resources network.
ACLs provide a basic level of security for accessing your network. If you do not configure ACLs on your router, all packets passing through the router could get to all parts of your network. You can use ACLs on a router that is positioned between two parts of your network to control traffic entering or exiting a specific part of your internal network. An ACL on the router allows one host to access a part of your network and prevents another host from accessing the same area. The ACL shown in Figure 3-12 allows Host A to access the Human Resources network but prevents Host B from accessing the Human Resources network.
![]() To provide the security benefits of ACLs, you should, at a minimum, configure ACLs at the perimeter of your networks. This configuration provides a basic buffer from the outside network, or from a less-controlled area of your own network, into a more sensitive area of your network. On these network edge routers, you should configure ACLs for each network protocol that is configured on the router interfaces.
To provide the security benefits of ACLs, you should, at a minimum, configure ACLs at the perimeter of your networks. This configuration provides a basic buffer from the outside network, or from a less-controlled area of your own network, into a more sensitive area of your network. On these network edge routers, you should configure ACLs for each network protocol that is configured on the router interfaces.
![]() You can use ACLs to mitigate many threats:
You can use ACLs to mitigate many threats:
-
 IP address spoofing (inbound)
 -
 IP address spoofing (outbound)
 -
 DoS TCP SYN attacks (blocking external attacks)
 -
 DoS TCP SYN attacks (using TCP intercept)
 -
 DoS Smurf attacks
 -
 Filtering ICMP messages (inbound)
 -
 Filtering ICMP messages (outbound)
![]() Cisco routers use ACLs as packet filters to decide which packets can access a router service or cross an interface. Packets that are allowed across an interface are permitted packets. Packets that are not allowed across an interface are denied packets.
Cisco routers use ACLs as packet filters to decide which packets can access a router service or cross an interface. Packets that are allowed across an interface are permitted packets. Packets that are not allowed across an interface are denied packets.
![]() An ACL enforces one or more corporate security policies. For example, a corporate security policy might only allow packets using source addresses from within the trusted network to access the Internet. Once this policy is written, you can develop an ACL that includes certain statements that, when applied to a router interface, can implement this policy.
An ACL enforces one or more corporate security policies. For example, a corporate security policy might only allow packets using source addresses from within the trusted network to access the Internet. Once this policy is written, you can develop an ACL that includes certain statements that, when applied to a router interface, can implement this policy.
![]() Cisco router security depends strongly on well-written ACLs to restrict access to router network services and to filter packets as they traverse the router.
Cisco router security depends strongly on well-written ACLs to restrict access to router network services and to filter packets as they traverse the router.
![]() ACLs express the set of rules that give added control for packets that enter inbound interfaces, packets that relay through the router, and packets that exit outbound interfaces of the router. ACLs do not act on packets that originate from the router itself. Instead, ACLs are statements that specify conditions of how the router handles the traffic flow through specified interfaces.
ACLs express the set of rules that give added control for packets that enter inbound interfaces, packets that relay through the router, and packets that exit outbound interfaces of the router. ACLs do not act on packets that originate from the router itself. Instead, ACLs are statements that specify conditions of how the router handles the traffic flow through specified interfaces.
![]() ACLs operate in two ways:
ACLs operate in two ways:
-
 Inbound: Incoming packets are processed before they are routed to an outbound interface. An inbound ACL is efficient because it saves the overhead of routing lookups if the packet will be discarded after it is denied by the filtering tests. If the packet is permitted by the tests, it is then processed for routing.
 -
 Outbound: Packets arriving on the inside interface are routed to the outbound interface, and then they are processed through the outbound ACL.
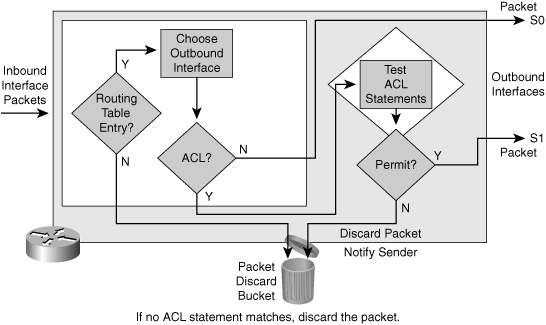
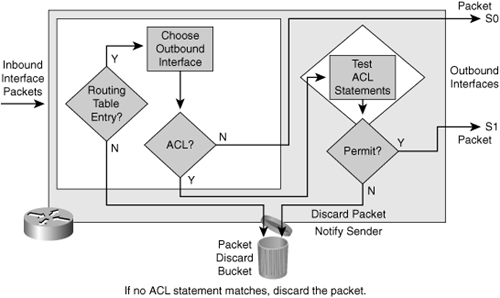
![]() Figure 3-13 shows an example of an outbound ACL. When a packet enters an interface, the router checks the routing table to see whether the packet is routable. If the packet is not routable, it is dropped.
Figure 3-13 shows an example of an outbound ACL. When a packet enters an interface, the router checks the routing table to see whether the packet is routable. If the packet is not routable, it is dropped.
![]() Next, the router checks to see whether the destination interface is grouped to an ACL. If the destination interface is not grouped to an ACL, the packet can be sent to the output buffer. Examples of outbound ACL operation are as follows:
Next, the router checks to see whether the destination interface is grouped to an ACL. If the destination interface is not grouped to an ACL, the packet can be sent to the output buffer. Examples of outbound ACL operation are as follows:
-
 If the outbound interface is S0, which has not been grouped to an outbound ACL, the packet is sent to S0 directly.
 -
 If the outbound interface is S1, which has been grouped to an outbound ACL, the packet is not sent out on S1 until it is tested by the combination of ACL statements that are associated with that interface. Based on the ACL tests, the packet is permitted or denied.
![]() For outbound lists, to permit means to send the packet to the output buffer, and to deny means to discard the packet.
For outbound lists, to permit means to send the packet to the output buffer, and to deny means to discard the packet.
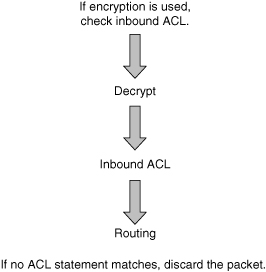
![]() With an inbound ACL, when a packet enters an interface, the router checks to see whether the source interface is grouped to an ACL. If the source interface is not grouped to an ACL, the router checks the routing table to see whether the packet is routable. If the packet is not routable, the router drops the packet. Figure 3-14 shows an example of an inbound ACL.
With an inbound ACL, when a packet enters an interface, the router checks to see whether the source interface is grouped to an ACL. If the source interface is not grouped to an ACL, the router checks the routing table to see whether the packet is routable. If the packet is not routable, the router drops the packet. Figure 3-14 shows an example of an inbound ACL.
![]() Examples of inbound ACL operation are as follows:
Examples of inbound ACL operation are as follows:
-
 If the inbound interface is E0, which has not been grouped to an inbound ACL, the packet is processed normally and the router checks to determine whether the packet is routable.
 -
 If the inbound interface is E1, which has been grouped to an inbound ACL, the packet is not processed and the routing table is not consulted until the packet is tested by the ACL that is associated with that interface. Based on the ACL tests, the packet is permitted or denied.
![]() For inbound lists, permit means to continue to process the packet after receiving it on an inbound interface, and deny means to discard the packet.
For inbound lists, permit means to continue to process the packet after receiving it on an inbound interface, and deny means to discard the packet.
| Note |
|
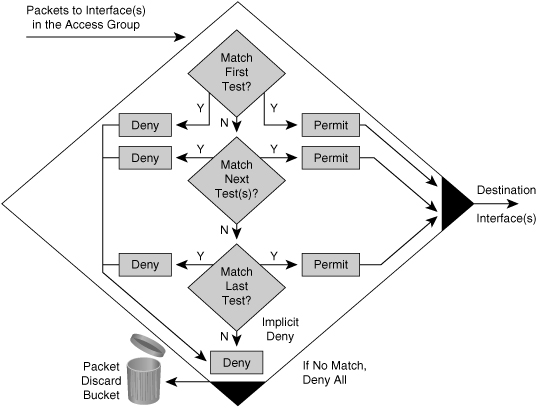
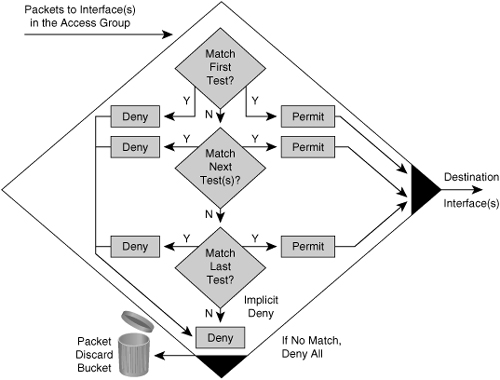
![]() ACL statements operate in a sequential, logical order, as shown in Figure 3-15. They evaluate packets from the top down, one statement at a time. If a packet header and an ACL statement match, the rest of the statements in the list are skipped, and the packet is permitted or denied as determined by the matched statement. If a packet header does not match an ACL statement, the packet is tested against the next statement in the list. This matching process continues until the end of the list is reached.
ACL statements operate in a sequential, logical order, as shown in Figure 3-15. They evaluate packets from the top down, one statement at a time. If a packet header and an ACL statement match, the rest of the statements in the list are skipped, and the packet is permitted or denied as determined by the matched statement. If a packet header does not match an ACL statement, the packet is tested against the next statement in the list. This matching process continues until the end of the list is reached.
![]() A final implied statement covers all packets for which conditions did not test true. This final test condition matches all other packets and results in a “deny” instruction. Instead of proceeding into or out of an interface, the router drops all of these remaining packets. This final statement is often referred to as the “implicit deny any statement.” Because of this statement, an ACL should have at least one permit statement in it; otherwise, the ACL blocks all traffic.
A final implied statement covers all packets for which conditions did not test true. This final test condition matches all other packets and results in a “deny” instruction. Instead of proceeding into or out of an interface, the router drops all of these remaining packets. This final statement is often referred to as the “implicit deny any statement.” Because of this statement, an ACL should have at least one permit statement in it; otherwise, the ACL blocks all traffic.
 Types of IP ACLs
![]() Cisco routers support two types of IP ACLs:
Cisco routers support two types of IP ACLs:
-
 Standard ACLs: Standard IP ACLs check the source addresses of packets that can be routed. The result either permits or denies the output for an entire protocol suite, based on the source network, subnet, or host IP address.
 -
 Extended ACLs: Extended IP ACLs check both the source and destination packet addresses. They can also check for specific protocols, port numbers, and other parameters, which allows administrators more flexibility and control.
![]() The two general methods you can use to create ACLs are as follows:
The two general methods you can use to create ACLs are as follows:
-
 Numbered ACLs: Use a number for identification.
 -
 Named ACLs: Use an alphanumeric string for identification.
![]() Before Cisco IOS Software Release 11.2, you had to assign a number to each ACL as you created it. Since then, either a number or a name can identify Cisco ACLs and the protocols that they filter.
Before Cisco IOS Software Release 11.2, you had to assign a number to each ACL as you created it. Since then, either a number or a name can identify Cisco ACLs and the protocols that they filter.
![]() Using numbered ACLs is an effective method on smaller networks with more homogeneously defined traffic. Because each ACL type is limited to an assigned range of numbers, it is easy to determine the type of ACL that you are using.
Using numbered ACLs is an effective method on smaller networks with more homogeneously defined traffic. Because each ACL type is limited to an assigned range of numbers, it is easy to determine the type of ACL that you are using.
![]() Specifying an ACL number from 1 to 99 or 1300 to 1999 instructs the router to accept numbered standard IP Version 4 (IPv4) ACL statements. Specifying an ACL number from 100 to 199 or 2000 to 2699 instructs the router to accept numbered extended IPv4 ACL statements.
Specifying an ACL number from 1 to 99 or 1300 to 1999 instructs the router to accept numbered standard IP Version 4 (IPv4) ACL statements. Specifying an ACL number from 100 to 199 or 2000 to 2699 instructs the router to accept numbered extended IPv4 ACL statements.
![]() The named ACL feature allows you to identify IP standard and extended ACLs with an alphanumeric string (name) rather than the numeric representations. Named IP ACLs provide you more flexibility in working with the ACL entries.
The named ACL feature allows you to identify IP standard and extended ACLs with an alphanumeric string (name) rather than the numeric representations. Named IP ACLs provide you more flexibility in working with the ACL entries.
| Tip |
|
![]() There are several benefits to IP access list entry sequence numbering:
There are several benefits to IP access list entry sequence numbering:
-
 You can edit the order of ACL statements.
 -
 You can remove individual statements from an ACL.
![]() Where additions are placed in an ACL depends on whether you use sequence numbers. There is no support for sequence numbering in software versions earlier than Cisco IOS Software Release 12.3; therefore, all the ACL additions for earlier software versions are placed at the end of the ACL. This means that should you deny a protocol, for example, but then decide to add a permit statement for a specific host who needs to use that protocol, this new permit statement would be placed below the deny statement stipulating that all traffic for that application be denied. With older versions, it is a question of first match, not necessarily best match.
Where additions are placed in an ACL depends on whether you use sequence numbers. There is no support for sequence numbering in software versions earlier than Cisco IOS Software Release 12.3; therefore, all the ACL additions for earlier software versions are placed at the end of the ACL. This means that should you deny a protocol, for example, but then decide to add a permit statement for a specific host who needs to use that protocol, this new permit statement would be placed below the deny statement stipulating that all traffic for that application be denied. With older versions, it is a question of first match, not necessarily best match.
![]() IP access list entry sequence numbering is a new edition to Cisco IOS Software that allows you to use sequence numbers to easily add, remove, or reorder statements in an IP ACL. With Cisco IOS Release 12.3 and later, you can place additions anywhere in the ACL based on the sequence number, providing that you use an unused sequence number. You might need to resequence your access list if you need to create unused sequence numbers.
IP access list entry sequence numbering is a new edition to Cisco IOS Software that allows you to use sequence numbers to easily add, remove, or reorder statements in an IP ACL. With Cisco IOS Release 12.3 and later, you can place additions anywhere in the ACL based on the sequence number, providing that you use an unused sequence number. You might need to resequence your access list if you need to create unused sequence numbers.
![]() Earlier than Cisco IOS Release 12.3, only named ACLs allow the removal of individual statements from an ACL using the no{deny | permit} protocol source source-wildcard destination destination-wildcard command, where the protocol source source-wildcard destination destination-wildcard parameters match the line you are trying to remove. With numbered ACLs, you would have to remove the whole list and re-create it with the desired statements. With Cisco IOS Software Release 12.3 and later, you can also use the no sequence-number command to delete a specific access list entry.
Earlier than Cisco IOS Release 12.3, only named ACLs allow the removal of individual statements from an ACL using the no{deny | permit} protocol source source-wildcard destination destination-wildcard command, where the protocol source source-wildcard destination destination-wildcard parameters match the line you are trying to remove. With numbered ACLs, you would have to remove the whole list and re-create it with the desired statements. With Cisco IOS Software Release 12.3 and later, you can also use the no sequence-number command to delete a specific access list entry.
![]() Well-designed and well-implemented ACLs add an important security component to your network. Follow these general principles to ensure that the ACLs you create have the intended results:
Well-designed and well-implemented ACLs add an important security component to your network. Follow these general principles to ensure that the ACLs you create have the intended results:
-
 Based on the test conditions, choose a standard or extended, numbered or named ACL.
 -
 Only one ACL per protocol, per direction, and per interface is allowed. Multiple ACLs are permitted per interface, but each must be for a different protocol or different direction.
 -
 Your ACL should be organized with consideration for its top-down process. Organize your ACL so that the more specific references to a network or subnet appear before ones that are more general. Place conditions that occur more frequently before conditions that occur less frequently.
 -
 Your ACL contains an implicit deny any statement at the end. Unless you end your ACL with an explicit permit any statement, by default, the ACL denies all traffic that fails to match any of the ACL lines. Every ACL should have at least one permit statement. Otherwise, all traffic is denied.
 -
 You should create the ACL before applying it to an interface. With most versions of Cisco IOS Software, an interface that has an empty ACL applied to it permits all traffic.
 -
 If you apply an ACL to an interface, the ACL filters traffic going through the router, but does not filter traffic that the router generates. You can apply ACLs on the router in other ways that will affect the traffic that the router generates, such as using the access-class command to control the traffic in and out of vty ports, which will be discussed later.
 -
 You should typically place extended ACLs as close as possible to the source of the traffic that you want to deny. Because standard ACLs do not specify destination addresses, you must put the standard ACL as close as possible to the destination of the traffic you want to deny for the source to reach intermediary networks.
| Note |
|
ACL Wildcard Masking
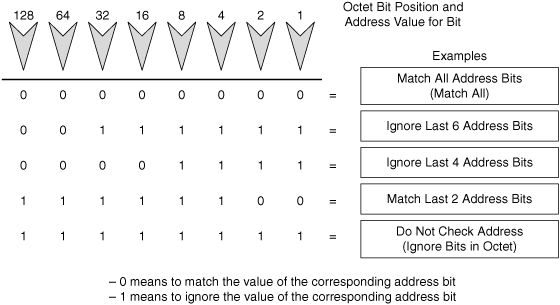
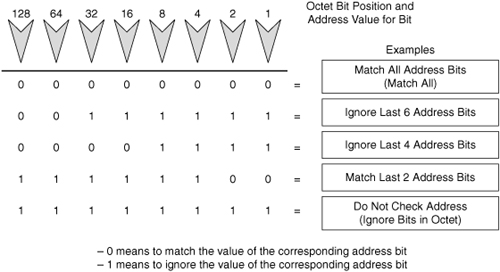
![]() Address filtering occurs when you use ACL address wildcard masking to identify how to check or ignore corresponding IP address bits. Wildcard masking for IP address bits uses the numbers 1 and 0 to identify how to treat the corresponding IP address bits, as follows:
Address filtering occurs when you use ACL address wildcard masking to identify how to check or ignore corresponding IP address bits. Wildcard masking for IP address bits uses the numbers 1 and 0 to identify how to treat the corresponding IP address bits, as follows:
-
 Wildcard mask bit 0: Match the corresponding bit value in the address
 -
 Wildcard mask bit 1: Do not check (ignore) the corresponding bit value in the address
| Note |
|
![]() Figure 3-16 illustrates how wildcard bits are used to check the corresponding address bits.
Figure 3-16 illustrates how wildcard bits are used to check the corresponding address bits.
![]() By carefully setting wildcard masks, you can permit or deny tests with one ACL statement. You can select a single IP address or any IP address.
By carefully setting wildcard masks, you can permit or deny tests with one ACL statement. You can select a single IP address or any IP address.
 Example: Wildcard Masking Process for IP Subnets
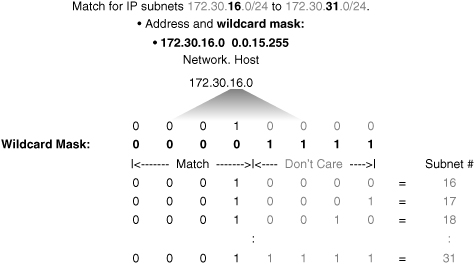
![]() In Figure 3-17, an administrator wants to test a range of IP subnets that is to be permitted or denied. Assume that the IP address is a Class B address (the first two octets are the network number), with 8 bits of subnetting (the third octet is for subnets). The administrator wants to use the IP wildcard masking bits to match subnets 172.30.16.0/24 to 172.30.31.0/24.
In Figure 3-17, an administrator wants to test a range of IP subnets that is to be permitted or denied. Assume that the IP address is a Class B address (the first two octets are the network number), with 8 bits of subnetting (the third octet is for subnets). The administrator wants to use the IP wildcard masking bits to match subnets 172.30.16.0/24 to 172.30.31.0/24.
![]() To use one ACL statement to match this range of subnets, use the IP address 172.30.16.0 in the ACL, which is the first subnet to be matched, followed by the required wildcard mask.
To use one ACL statement to match this range of subnets, use the IP address 172.30.16.0 in the ACL, which is the first subnet to be matched, followed by the required wildcard mask.
![]() First, the wildcard mask matches the first two octets (172.30) of the IP address using corresponding 0 bits in the first two octets of the wildcard mask.
First, the wildcard mask matches the first two octets (172.30) of the IP address using corresponding 0 bits in the first two octets of the wildcard mask.
![]() Because there is no interest in an individual host, the wildcard mask ignores the final octet by using the corresponding 1 bit in the wildcard mask. For example, the final octet of the wildcard mask is 255 in decimal.
Because there is no interest in an individual host, the wildcard mask ignores the final octet by using the corresponding 1 bit in the wildcard mask. For example, the final octet of the wildcard mask is 255 in decimal.
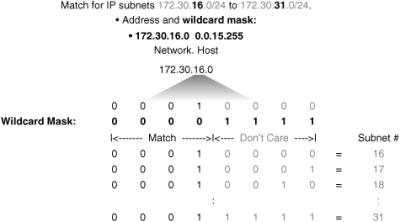
![]() In the third octet, where the subnet address occurs, the wildcard mask of decimal 15, or binary 00001111, shown in bold, matches the high-order 4 bits of the IP address. In this case, the wildcard mask matches subnets starting with the 172.30.16.0/24 subnet. For the final (low-end) 4 bits in this octet, shown in gray, the wildcard mask indicates that the bits can be ignored. In these positions, the address value can be binary 0 or binary 1. Thus, the wildcard mask matches subnet 16, 17, 18, and so on up to subnet 31. The wildcard mask does not match any other subnets.
In the third octet, where the subnet address occurs, the wildcard mask of decimal 15, or binary 00001111, shown in bold, matches the high-order 4 bits of the IP address. In this case, the wildcard mask matches subnets starting with the 172.30.16.0/24 subnet. For the final (low-end) 4 bits in this octet, shown in gray, the wildcard mask indicates that the bits can be ignored. In these positions, the address value can be binary 0 or binary 1. Thus, the wildcard mask matches subnet 16, 17, 18, and so on up to subnet 31. The wildcard mask does not match any other subnets.
![]() In Figure 3-17, the address 172.30.16.0 with the wildcard mask 0.0.15.255 matches subnets 172.30.16.0/24 to 172.30.31.0/24.
In Figure 3-17, the address 172.30.16.0 with the wildcard mask 0.0.15.255 matches subnets 172.30.16.0/24 to 172.30.31.0/24.
![]() In some cases, you must use more than one ACL statement to match a range of subnets. For example, to match 10.1.4.0/24 to 10.1.8.0/24, use 10.1.4.0 0.0.3.255 and 10.1.8.0 0.0.0.255.
In some cases, you must use more than one ACL statement to match a range of subnets. For example, to match 10.1.4.0/24 to 10.1.8.0/24, use 10.1.4.0 0.0.3.255 and 10.1.8.0 0.0.0.255.
![]() So, suppose that you want to block all IP traffic from the range of subnets of Figure 3-17, the access list could be this:
So, suppose that you want to block all IP traffic from the range of subnets of Figure 3-17, the access list could be this:
Router(config)# access-list 1 deny 172.30.16.0 0.0.15.255
![]() The 0 and 1 bits in an ACL wildcard mask cause the ACL to either match or ignore the corresponding bit in the IP address. Working with decimal representations of binary wildcard mask bits can be tedious. For the most common uses of wildcard masking, you can use abbreviations. These abbreviations reduce how many numbers you are required to enter while configuring address test conditions.
The 0 and 1 bits in an ACL wildcard mask cause the ACL to either match or ignore the corresponding bit in the IP address. Working with decimal representations of binary wildcard mask bits can be tedious. For the most common uses of wildcard masking, you can use abbreviations. These abbreviations reduce how many numbers you are required to enter while configuring address test conditions.
 Example: Wildcard Masking Process with a Single IP Address
![]() In Figure 3-18, instead of entering 172.30.16.29 0.0.0.0, you can use the string host 172.30.16.29. Using the abbreviation host communicates the same test condition to the Cisco IOS ACL Software. The command syntax using the abbreviation host is as follows:
In Figure 3-18, instead of entering 172.30.16.29 0.0.0.0, you can use the string host 172.30.16.29. Using the abbreviation host communicates the same test condition to the Cisco IOS ACL Software. The command syntax using the abbreviation host is as follows:
Router(config)# access-list 2 permit host 172.30.16.29
![]() And this is the same as entering the following:
And this is the same as entering the following:
Router(config)# access-list 2 permit 172.30.16.29 0.0.0.0
![]() Should you enter the full host mask of 0.0.0.0, the router will convert the command for the host abbreviation automatically.
Should you enter the full host mask of 0.0.0.0, the router will convert the command for the host abbreviation automatically.
 Example: Wildcard Masking Process with a Match Any IP Address
![]() In Figure 3-19, instead of entering 0.0.0.0 255.255.255.255, you can use the word any by itself as the keyword. Using the abbreviation any communicates the same test condition to the Cisco IOS ACL Software. The command syntax using the keyword any is as follows:
In Figure 3-19, instead of entering 0.0.0.0 255.255.255.255, you can use the word any by itself as the keyword. Using the abbreviation any communicates the same test condition to the Cisco IOS ACL Software. The command syntax using the keyword any is as follows:
 Router(config)# access-list 3 permit 0.0.0.0 255.255.255.255
![]() And this is the same as entering the following:
And this is the same as entering the following:
Router(config)# access-list 2 permit any
| Tip |
|
Using ACLs to Control Traffic
![]() To configure numbered standard IPv4 ACLs on a Cisco router, you must create a standard IPv4 ACL and activate an ACL on an interface. The access-list command creates an entry in a standard IPv4 traffic filter list.
To configure numbered standard IPv4 ACLs on a Cisco router, you must create a standard IPv4 ACL and activate an ACL on an interface. The access-list command creates an entry in a standard IPv4 traffic filter list.
![]() The following is the syntax for the access-list command:
The following is the syntax for the access-list command:
Router(config)# access-list access-list-number {permit | deny | remark} source-
address [mask] [log]
![]() To create an access list, use 1 to 99 for the access-list-number parameter. The first entry is assigned a sequence number of 10, and successive entries are incremented by 10. The default wildcard mask is 0.0.0.0 (only standard ACL). The remark argument lets you add a description to the ACL.
To create an access list, use 1 to 99 for the access-list-number parameter. The first entry is assigned a sequence number of 10, and successive entries are incremented by 10. The default wildcard mask is 0.0.0.0 (only standard ACL). The remark argument lets you add a description to the ACL.
| Caution |
|
![]() The log option of the access-list command causes an informational logging message about the packet that matches the ACL entry to be sent to the console.
The log option of the access-list command causes an informational logging message about the packet that matches the ACL entry to be sent to the console.
| Tip |
|
![]() The logging message includes the ACL number, whether the packet was permitted or denied, the source address, and the number of packets. The message is generated for the first packet that matches, and then at five-minute intervals, including the number of packets permitted or denied in the previous five-minute interval.
The logging message includes the ACL number, whether the packet was permitted or denied, the source address, and the number of packets. The message is generated for the first packet that matches, and then at five-minute intervals, including the number of packets permitted or denied in the previous five-minute interval.
![]() The ip access-group command links an existing ACL to an interface. Only one ACL per protocol, per direction, and per interface is allowed. The syntax for this command is as follows:
The ip access-group command links an existing ACL to an interface. Only one ACL per protocol, per direction, and per interface is allowed. The syntax for this command is as follows:
 Router(config-if)# ip access-group access-list-number {in | out}
| Note |
|
![]() Table 3-2 provides an example of the steps required to configure and apply a numbered standard ACL on a router.
Table 3-2 provides an example of the steps required to configure and apply a numbered standard ACL on a router.
|
|
|
|
|---|---|---|
|
|
|
|
|
|
| |
|
| ||
|
|
|
|
|
|
|
|
|
|
|
 Example: Numbered Standard IPv4 ACL: Deny a Specific Subnet
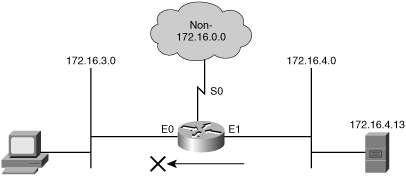
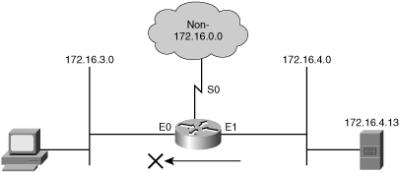
![]() Table 3-3 describes the command syntax that is presented in Example 3-1 for the network topology shown in Figure 3-20.
Table 3-3 describes the command syntax that is presented in Example 3-1 for the network topology shown in Figure 3-20.
|
|
|
|---|---|
|
|
|
|
|
|
|
|
|
|
|
|
|
| |
|
|
|
|
|
|
r1(config)# access-list 1 deny 172.16.4.0  0.0.0.255
r1(config)# access-list 1 permit any
( implicit deny all = access-list 1 deny 0.0.0.0 255.255.255.255 )
r1(config)# interface ethernet 0
r1(config-if)# ip access-group 1 out
![]() The ACL shown in Example 3-1 is designed to block traffic from a specific subnet, 172.16.4.0, and to allow all other traffic to be forwarded out E0. However, traffic from subnet 172.16.4.0 is not filtered when leaving by S0.
The ACL shown in Example 3-1 is designed to block traffic from a specific subnet, 172.16.4.0, and to allow all other traffic to be forwarded out E0. However, traffic from subnet 172.16.4.0 is not filtered when leaving by S0.
 vty Access
![]() To control traffic into and out of the router (not through the router), you protect the router virtual ports. A virtual port (or virtual terminal line) is commonly referred to as vty. By default, there are five such virtual terminal lines, numbered vty 0 through vty 4. You can configure Cisco IOS Software images to support more than five vty ports.
To control traffic into and out of the router (not through the router), you protect the router virtual ports. A virtual port (or virtual terminal line) is commonly referred to as vty. By default, there are five such virtual terminal lines, numbered vty 0 through vty 4. You can configure Cisco IOS Software images to support more than five vty ports.
![]() Restricting vty access is primarily a technique for increasing network security and defining which addresses are allowed Telnet access to the router EXEC process.
Restricting vty access is primarily a technique for increasing network security and defining which addresses are allowed Telnet access to the router EXEC process.
![]() The command used to filter Telnet traffic is as follows:
The command used to filter Telnet traffic is as follows:
 Router(config-line)# access-class access-list-number {in | out}
![]() Filtering Telnet traffic is typically considered an extended IP ACL function because it filters a higher-level protocol. However, because you are using the access-class command to filter incoming or outgoing Telnet sessions by source address and apply filtering to vty lines, you can use standard IP ACL statements to control vty access.
Filtering Telnet traffic is typically considered an extended IP ACL function because it filters a higher-level protocol. However, because you are using the access-class command to filter incoming or outgoing Telnet sessions by source address and apply filtering to vty lines, you can use standard IP ACL statements to control vty access.
![]() In Example 3-2, you are permitting any device on network 192.168.1.0 0.0.0.255 to establish a virtual terminal session with the router. Of course, the user must know the appropriate passwords to enter user mode and privileged mode. In Example 3-2, we can only assume that the protocol used to exchange with the router is Telnet; however, other protocol can be filtered by the access-class command, such as Secure Shell (SSH).
In Example 3-2, you are permitting any device on network 192.168.1.0 0.0.0.255 to establish a virtual terminal session with the router. Of course, the user must know the appropriate passwords to enter user mode and privileged mode. In Example 3-2, we can only assume that the protocol used to exchange with the router is Telnet; however, other protocol can be filtered by the access-class command, such as Secure Shell (SSH).
R1(config)# access-list 12 permit 192.168.1.0 0.0.0.255
!
R1(config)# line vty 0 4
R1(config-line)# access-class 12 in
![]() Notice that identical restrictions have been set on every vty line (0 to 4) because you cannot control on which vty line a user will connect. The implicit deny any statement still applies to the ACL when it is used as an access class entry.
Notice that identical restrictions have been set on every vty line (0 to 4) because you cannot control on which vty line a user will connect. The implicit deny any statement still applies to the ACL when it is used as an access class entry.
 Numbered Extended IPv4 ACL
![]() Use extended IPv4 ACLs, which are named or numbered 100 to 199 and 2000 to 2699, to provide more precise traffic-filtering control, because extended IPv4 ACLs check for the source and destination IPv4 address. In addition, with an extended ACL statement, you can specify the protocol and optional TCP or UDP application to filter traffic more precisely. To specify an application, you can configure either the port number or name of a well-known application.
Use extended IPv4 ACLs, which are named or numbered 100 to 199 and 2000 to 2699, to provide more precise traffic-filtering control, because extended IPv4 ACLs check for the source and destination IPv4 address. In addition, with an extended ACL statement, you can specify the protocol and optional TCP or UDP application to filter traffic more precisely. To specify an application, you can configure either the port number or name of a well-known application.
![]() Table 3-4 shows some well-known port numbers of IP protocols that you can use with extended access lists.
Table 3-4 shows some well-known port numbers of IP protocols that you can use with extended access lists.
|
|
|
|---|---|
|
|
|
|
|
|
|
|
|
|
|
|
|
|
|
|
|
|
|
|
|
![]() To configure numbered extended IPv4 ACLs on a Cisco router, create an extended IPv4 ACL and activate that ACL on an interface. Use the access-list command to create an entry to express a condition statement in a complex filter. Table 3-5 explains the syntax of the command for configuring a numbered extended ACL shown here:
To configure numbered extended IPv4 ACLs on a Cisco router, create an extended IPv4 ACL and activate that ACL on an interface. Use the access-list command to create an entry to express a condition statement in a complex filter. Table 3-5 explains the syntax of the command for configuring a numbered extended ACL shown here:
Router(config)# access-list access-list-number {permit | deny} protocol source
source-wildcard [operator port] destination destination-wildcard [operator port]
[established] [log]
|
|
|
|---|---|
|
|
|
|
|
|
|
|
|
|
|
|
|
|
|
|
|
|
|
|
|
|
|
|
| Note |
|
![]() To link an existing extended ACL to an interface, use the following command:
To link an existing extended ACL to an interface, use the following command:
 Router(config-if)# ip access-group access-list-number (in | out)
![]() Only one ACL per protocol, per direction, and per interface is allowed.
Only one ACL per protocol, per direction, and per interface is allowed.
![]() Table 3-6 describes the parameters of the ip access-group command.
Table 3-6 describes the parameters of the ip access-group command.
|
|
|
|---|---|
|
|
|
|
|
|
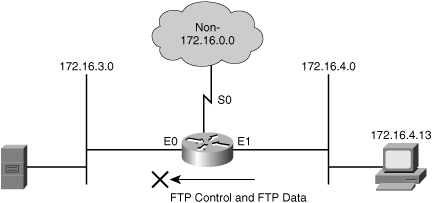
![]() Example 3-3 shows the configuration for denying FTP access from subnet 172.16.4.0/24 to subnet 172.16.3.0/24, for the network depicted in Figure 3-21. All other traffic is allowed. By applying the ACL to the E0 interface in an outbound direction, traffic is dropped just before it would be transmitted out the E0 interface.
Example 3-3 shows the configuration for denying FTP access from subnet 172.16.4.0/24 to subnet 172.16.3.0/24, for the network depicted in Figure 3-21. All other traffic is allowed. By applying the ACL to the E0 interface in an outbound direction, traffic is dropped just before it would be transmitted out the E0 interface.
r1(config)# access-list 101 deny tcp 172.16.4.0 0.0.0.255 172.16.3.0 0.0.0.255 eq 21
r1(config)# access-list 101 deny tcp 172.16.4.0 0.0.0.255 172.16.3.0 0.0.0.255 eq 20
r1(config)# access-list  101 permit ip any any
(implicit deny all)
(access-list 101 deny ip 0.0.0.0 255.255.255.255 0.0.0.0 255.255.255.255)
r1(config)# interface ethernet 0
r1(config-if)# ip access-group 101 out
![]() In Example 3-4, the established parameter of the extended ACL allows responses to traffic that originate from the mail host, 200.1.1.2, to return inbound on the serial 0 interface. A match occurs if the TCP datagram has the ACK or reset (RST) bits set, which indicates that the packet belongs to an existing connection. Without the established parameter in the ACL statement, the mail host could only receive SMTP traffic but not send it.
In Example 3-4, the established parameter of the extended ACL allows responses to traffic that originate from the mail host, 200.1.1.2, to return inbound on the serial 0 interface. A match occurs if the TCP datagram has the ACK or reset (RST) bits set, which indicates that the packet belongs to an existing connection. Without the established parameter in the ACL statement, the mail host could only receive SMTP traffic but not send it.
| Caution |
|
Router(config)# access-list 102 permit tcp any host 200.1.1.2 established
Router(config)# access-list 102 permit tcp any host 200.1.1.2 eq smtp
Router(config)# interface serial 0
Router(config-if)# ip access-group 102 in
 Displaying ACLs
![]() When you finish the ACL configuration, use the show commands to verify the configuration. Use the show access-lists command to display the contents of all ACLs, as shown in Example 3-5. By entering the ACL name or number as an option for this command, you can display a specific ACL. To display the contents of only the IP ACLs, use the show ip access-list command.
When you finish the ACL configuration, use the show commands to verify the configuration. Use the show access-lists command to display the contents of all ACLs, as shown in Example 3-5. By entering the ACL name or number as an option for this command, you can display a specific ACL. To display the contents of only the IP ACLs, use the show ip access-list command.
r1# show access-lists
Extended IP access list 102
 permit ip any host 128.88.1.6
Extended IP access list mailblock
 permit tcp any 128.88.0.0 0.0.255.255
   established
| Note |
|
![]() The show ip interfaces command displays IP interface information and indicates whether any IP ACLs are set on the interface. In the show ip interfaces e0 command output shown in Example 3-6, IP ACL 1 has been configured on the E0 interface as an inbound ACL. No outbound IP ACL has been configured on the E0 interface.
The show ip interfaces command displays IP interface information and indicates whether any IP ACLs are set on the interface. In the show ip interfaces e0 command output shown in Example 3-6, IP ACL 1 has been configured on the E0 interface as an inbound ACL. No outbound IP ACL has been configured on the E0 interface.
r1# show ip interfaces e0
Ethernet0 is up, line protocol is up
 Internet address is 10.1.1.11/24
 Broadcast address is 255.255.255.255
 Address determined by setup command
 MTU is 1500 bytes
 Helper address is not set
 Directed broadcast forwarding is disabled
 Outgoing access list is mailblock
 Inbound  access list is 102
 Proxy ARP is enabled



0 comments
Post a Comment