Configuring IPsec on a Site-to-Site VPN Using Cisco SDM
![]() The steps to implement an IPsec site-to-site VPN using the Cisco router, as described in the preceding portions of the chapter, can be also performed using the Security Device Manager (SDM), as described in the sections that follow.
The steps to implement an IPsec site-to-site VPN using the Cisco router, as described in the preceding portions of the chapter, can be also performed using the Security Device Manager (SDM), as described in the sections that follow.
 Introducing the Cisco SDM VPN Wizard Interface
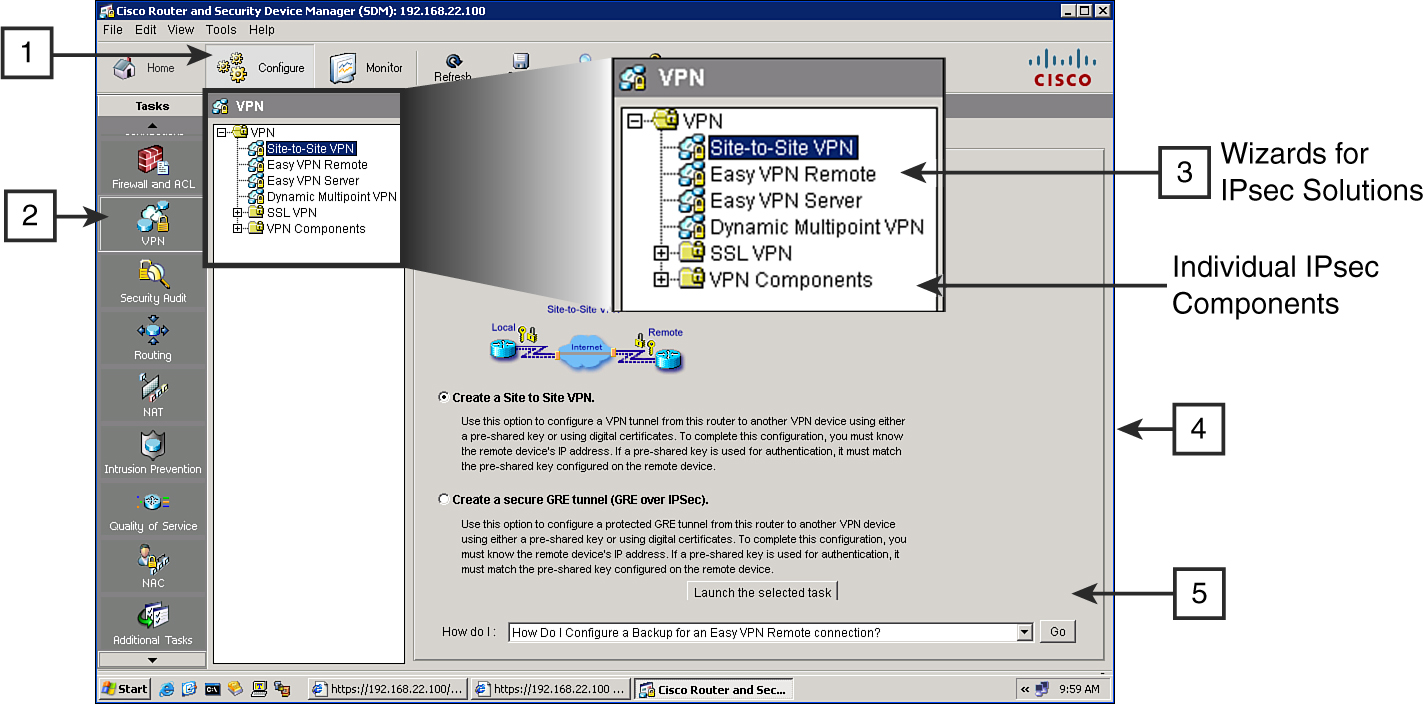
![]() To select and start a VPN wizard, follow these steps, as illustrated Figure 5-29:
To select and start a VPN wizard, follow these steps, as illustrated Figure 5-29:
|
|
|
|
|
|
|
|
|
|
|
|
|
|
|
 Site-to-Site VPN Components
![]() The Cisco SDM VPN wizards use two sources to create a VPN connection:
The Cisco SDM VPN wizards use two sources to create a VPN connection:
-
 User input during a step-by-step wizard process
 -
 Preconfigured VPN components
![]() The Cisco SDM provides some default VPN components:
The Cisco SDM provides some default VPN components:
-
 Two IKE policies
 -
 An IPsec transform set for the quick setup wizard
![]() The VPN wizards create other components during the step-by-step configuration process. You must configure some components before you can use the wizards (for example, PKI).
The VPN wizards create other components during the step-by-step configuration process. You must configure some components before you can use the wizards (for example, PKI).
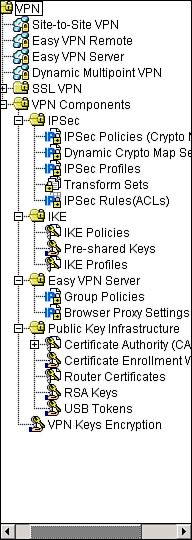
![]() Figure 5-30 illustrates the VPN navigation bar, which contains three major sections:
Figure 5-30 illustrates the VPN navigation bar, which contains three major sections:
-
 VPN wizards
-
 Site-to-site VPN
 -
 Easy VPN Remote
 -
 Easy VPN Server
 -
 Dynamic Multipoint VPN
-
-
 SSL VPN
 -
 VPN components:
-
 IPsec (main component)
 -
 IKE (main component)
 -
 Easy VPN Server (optional component): Group Policies and Browser Proxy Settings
 -
 Public Key Infrastructure (optional component): For IKE authentication using digital certificates
-
![]() This option appears if the Cisco IOS Software image on your router supports type 6 encryption, also referred to as VPN key encryption. You can use this window to specify a master key to use when encrypting VPN keys, such as PSKs, Cisco Easy VPN keys, and Extended Authentication (XAUTH) keys. When the keys are encrypted, they are not readable by someone viewing the router configuration file.
This option appears if the Cisco IOS Software image on your router supports type 6 encryption, also referred to as VPN key encryption. You can use this window to specify a master key to use when encrypting VPN keys, such as PSKs, Cisco Easy VPN keys, and Extended Authentication (XAUTH) keys. When the keys are encrypted, they are not readable by someone viewing the router configuration file.
-
 The VPN wizards simplify the configuration of individual VPN components. On the other hand, you can use the individual IPsec components section to modify parameters that may have been misconfigured during the VPN wizard step-by-step configuration.
 Using the Cisco SDM Wizards to Configure Site-to-Site VPNs
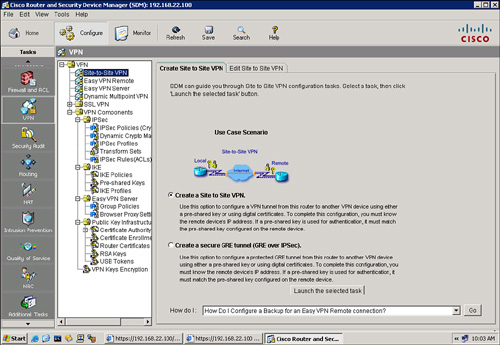
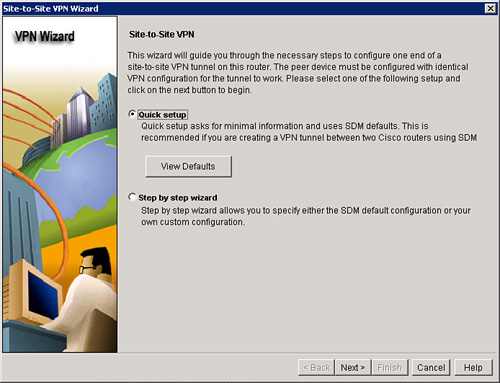
![]() Use a web browser to start the Cisco SDM on a router. Select the VPN wizard by choosing Configure > VPN > Site-to-Site VPN, as shown in Figure 5-31. Follow these steps to create and configure a classic site-to-site VPN:
Use a web browser to start the Cisco SDM on a router. Select the VPN wizard by choosing Configure > VPN > Site-to-Site VPN, as shown in Figure 5-31. Follow these steps to create and configure a classic site-to-site VPN:
|
|
|
|
|
|
|
|
|
Quick Setup
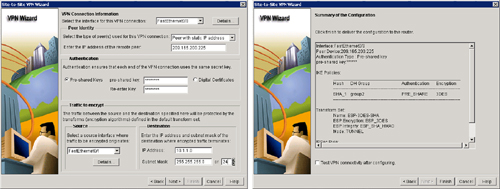
![]() The quick setup uses a single window to configure the VPN connection, as shown in Figure 5-33, and includes the following parameters:
The quick setup uses a single window to configure the VPN connection, as shown in Figure 5-33, and includes the following parameters:
-
 Interface to use for the VPN connection (usually the outside interface)
 -
-
 Type of peer
 -
 IP address of the peer
-
-
 Authentication method:
-
 PSKs (specify the secret)
 -
 Digital certificates (choose a certificate that should have been created beforehand)
 Traffic to encrypt:
-
 Source interface
 -
 Destination IP subnet
-
Step-by-Step Setup
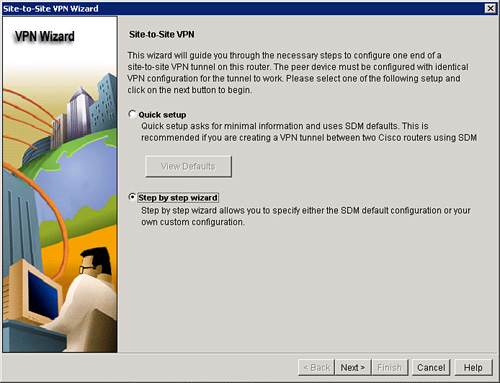
![]() The step-by-step wizard, shown in Figure 5-34, requires multiple steps to configure the VPN connection and includes the following parameters:
The step-by-step wizard, shown in Figure 5-34, requires multiple steps to configure the VPN connection and includes the following parameters:
-
 Connection settings: Outside interface, peer identity, and authentication credentials
 -
 IKE proposals: IKE proposal priority, encryption, hashing algorithm, IKE authentication method, DH group, and IKE lifetime
 -
 IPsec transform sets: Name, integrity algorithm, encryption algorithm, mode of operation (tunnel or transport), and compression
 -
 Traffic to protect: Define single source and destination subnets or define an ACL to use for more complex VPNs
![]() The last task of the step-by-step wizard is to review and complete the configuration.
The last task of the step-by-step wizard is to review and complete the configuration.
Connection Settings
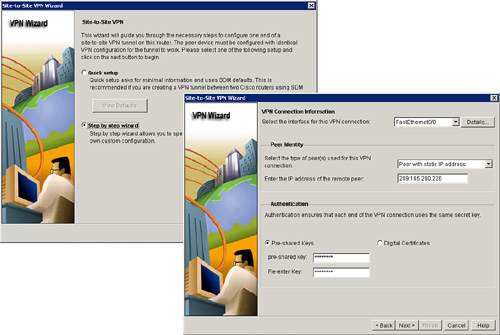
![]() The first task in the step-by-step wizard is to configure the connection settings. Follow these steps, shown in Figure 5-35, to configure the connection settings:
The first task in the step-by-step wizard is to configure the connection settings. Follow these steps, shown in Figure 5-35, to configure the connection settings:
|
|
|
|
|
|
|
|
|
|
|
|
IKE Proposals
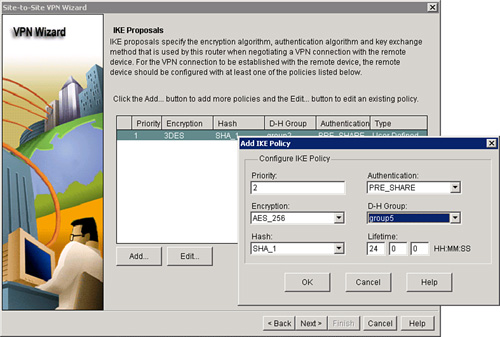
![]() The second task in the step-by-step wizard is to configure IKE proposals, as shown in Figure 5-36. Follow these steps to configure the IKE proposals:
The second task in the step-by-step wizard is to configure IKE proposals, as shown in Figure 5-36. Follow these steps to configure the IKE proposals:
|
|
|
|
|
|
|
|
|
|
|
|
Transform Sets
![]() The third task in the step-by-step wizard is to configure a transform set, as shown in Figure 5-37. Follow these steps to configure a transform set:
The third task in the step-by-step wizard is to configure a transform set, as shown in Figure 5-37. Follow these steps to configure a transform set:
Defining What Traffic to Protect
![]() The next steps involve using the Cisco SDM to define what traffic the VPN should protect.
The next steps involve using the Cisco SDM to define what traffic the VPN should protect.
Option 1: Single Source and Destination Subnet
![]() To define what traffic needs protection, you can use the simple mode, which allows the protection of traffic between one pair of IP subnets.
To define what traffic needs protection, you can use the simple mode, which allows the protection of traffic between one pair of IP subnets.
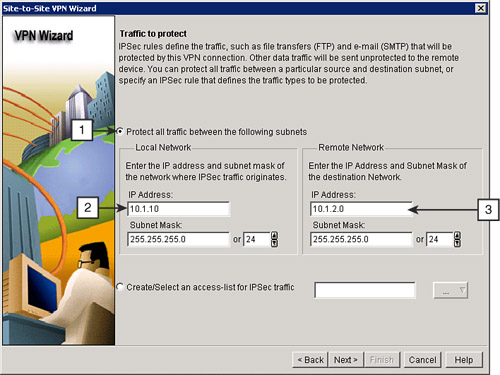
![]() To protect the traffic between a particular pair of IP subnets, as shown in Figure 5-38, follow these steps:
To protect the traffic between a particular pair of IP subnets, as shown in Figure 5-38, follow these steps:
|
|
|
|
|
|
|
|
|
Option 2: Using an ACL
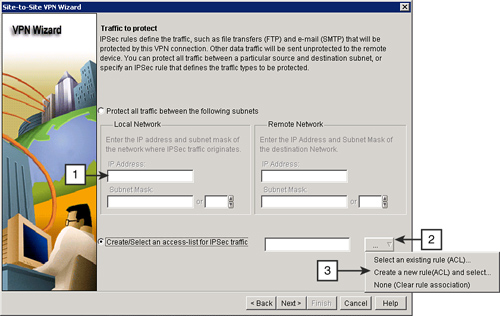
![]() To specify an IPsec rule that defines the traffic types to be protected, as shown in Figure 5-39, follow these steps:
To specify an IPsec rule that defines the traffic types to be protected, as shown in Figure 5-39, follow these steps:
|
|
|
|
|
|
|
|
|
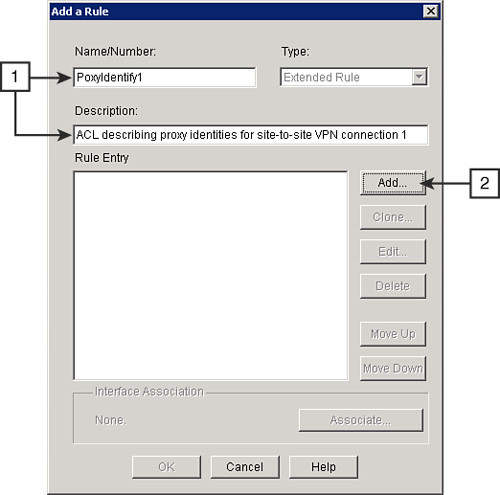
![]() When you create a new ACL to define traffic that needs protection, you are presented with a window that lists the created access rule entries if any already exist. If none exist, you will be required to create a new rule, as shown in Figure 5-40. To create a new rule, follow these steps:
When you create a new ACL to define traffic that needs protection, you are presented with a window that lists the created access rule entries if any already exist. If none exist, you will be required to create a new rule, as shown in Figure 5-40. To create a new rule, follow these steps:
|
|
|
|
|
|
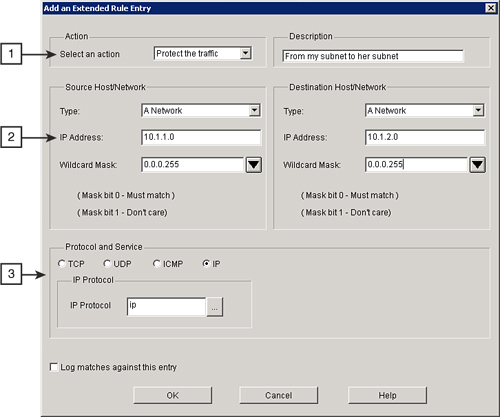
![]() Follow these steps to configure a new rule entry, as shown in Figure 5-41:
Follow these steps to configure a new rule entry, as shown in Figure 5-41:
 Completing the Configuration
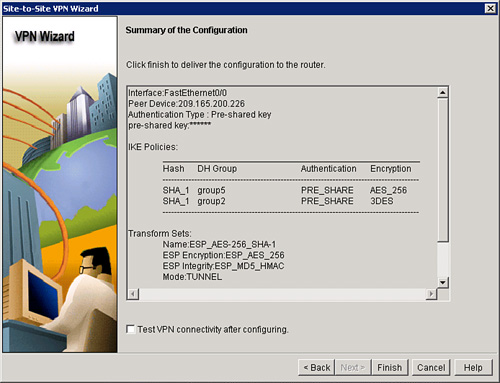
![]() At the end of the configuration, the wizard presents a summary of all the configured parameters, as shown in Figure 5-42. To modify the configuration, click the Back button. Click the Finish button to complete the configuration.
At the end of the configuration, the wizard presents a summary of all the configured parameters, as shown in Figure 5-42. To modify the configuration, click the Back button. Click the Finish button to complete the configuration.
Testing the Tunnel Configuration and Operation
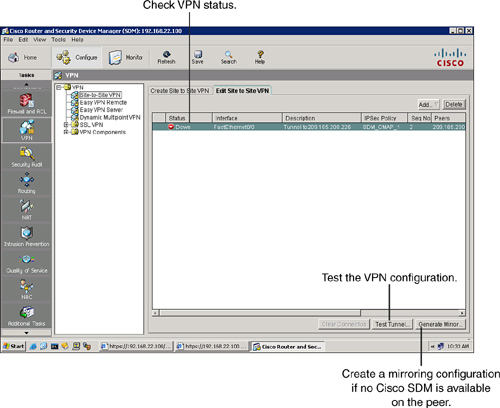
![]() To run a test to determine the configuration of the tunnel, choose Configure > VPN > Site-to-Site VPN > Edit Site to Site VPN and click the Test Tunnel button, as shown in Figure 5-43. You can also click the Generate Mirror button to generate a mirroring configuration that is required on the other end of the tunnel. This is useful if the other router does not have Cisco SDM and if you have to use the CLI to configure the tunnel.
To run a test to determine the configuration of the tunnel, choose Configure > VPN > Site-to-Site VPN > Edit Site to Site VPN and click the Test Tunnel button, as shown in Figure 5-43. You can also click the Generate Mirror button to generate a mirroring configuration that is required on the other end of the tunnel. This is useful if the other router does not have Cisco SDM and if you have to use the CLI to configure the tunnel.
Monitoring Tunnel Operation
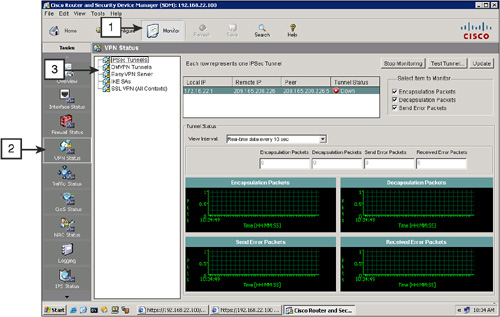
![]() To see all the IPsec tunnels, their parameters, and status, follow these steps, as shown in Figure 5-44:
To see all the IPsec tunnels, their parameters, and status, follow these steps, as shown in Figure 5-44:
|
|
|
|
|
|
|
|
|
Advanced Monitoring
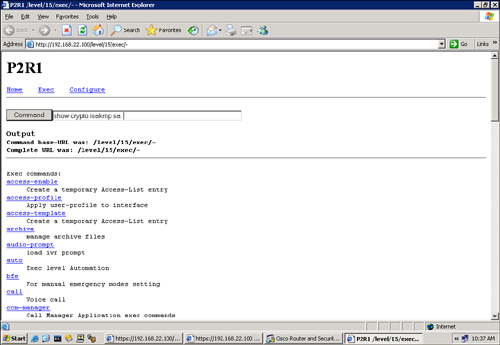
![]() The basic Cisco IOS web interface also allows administrators to use the web interface to enter Cisco IOS CLI commands to monitor and troubleshoot the router, as shown in Figure 5-45.
The basic Cisco IOS web interface also allows administrators to use the web interface to enter Cisco IOS CLI commands to monitor and troubleshoot the router, as shown in Figure 5-45.
![]() Two of the most useful show commands to determine the status of the IPsec VPN connections are as follows:
Two of the most useful show commands to determine the status of the IPsec VPN connections are as follows:
-
 show crypto isakmp sa: This command displays all the current IKE SAs. QM_IDLE status indicates an active IKE SA.
 -
 show crypto ipsec sa: This command displays the settings used by the current SAs. Nonzero encryption and decryption statistics can indicate a working set of IPsec SAs.
![]() Example 5-11 shows some sample output from the show crypto ipsec sa command. If this command shows that an SA has been established, it indicates that the rest of the configuration is working. Take special note of the pkts encrypt and pkts decrypt values because these indicate that traffic is flowing through the tunnel.
Example 5-11 shows some sample output from the show crypto ipsec sa command. If this command shows that an SA has been established, it indicates that the rest of the configuration is working. Take special note of the pkts encrypt and pkts decrypt values because these indicate that traffic is flowing through the tunnel.
RouterA# show crypto ipsec sa
interface: Ethernet0/1
   Crypto map tag: mymap, local addr. 172.16.100.100
   local ident (addr/mask/prot/port): (172.16.100.100/255.255.255.255/0/0)
  remote ident (addr/mask/prot/port): (172.16.200.200/255.255.255.255/0/0)
  current_peer: 172.16.200.200
    PERMIT, flags={origin_is_acl,}
   #pkts encaps: 21, #pkts encrypt: 21, #pkts digest 0
   #pkts decaps: 21, #pkts decrypt: 21, #pkts verify 0
   #send errors 0, #recv errors 0
    local crypto endpt.: 172.16.100.100, remote crypto endpt.: 172.16.200.200
    path mtu 1500, media mtu 1500
    current outbound spi: 8AE1C9C
Troubleshooting
![]() Use a terminal to connect to the Cisco IOS router if you want to use debugging commands to troubleshoot VPN connectivity.
Use a terminal to connect to the Cisco IOS router if you want to use debugging commands to troubleshoot VPN connectivity.
![]() The debug crypto isakmp command displays detailed information about the IKE Phase 1 and IKE Phase 2 negotiation processes. The debug crypto ipsec command displays detailed information about IPsec events.
The debug crypto isakmp command displays detailed information about the IKE Phase 1 and IKE Phase 2 negotiation processes. The debug crypto ipsec command displays detailed information about IPsec events.
| Caution |
|
Summary
![]() The key points covered in this chapters are as follows:
The key points covered in this chapters are as follows:
-
 IPsec is an ubiquitous VPN technology that provides confidentiality, data-integrity, authentication, and antireplay services.
 -
 A crypto ACL defines interesting traffic, which is the traffic to be protected by the VPN tunnel.
 -
 The IPsec VPN wizard offers two choices: user input via a step-by-step process or preconfigured VPN components.
 References
![]() For additional information, refer to these resources:
For additional information, refer to these resources:
-
 Cisco Systems, Inc. Cisco IOS IPSEC Introduction, http://www.cisco.com/en/US/products/ps6635/products_ios_protocol_group_home.html
 -
 Systems, Inc. Export Compliance & Regulatory Affairs: Encryption Control Guidance, http://www.cisco.com/wwl/export/crypto
 -
 Carmouche, J. H. IPsec Virtual Private Network Fundamentals (Cisco Press, 2007)
 -
 Deal, R. The Complete Cisco VPN Configuration Guide (Cisco Press, 2005)


0 comments
Post a Comment