 Site-to-Site IPsec VPN Operations
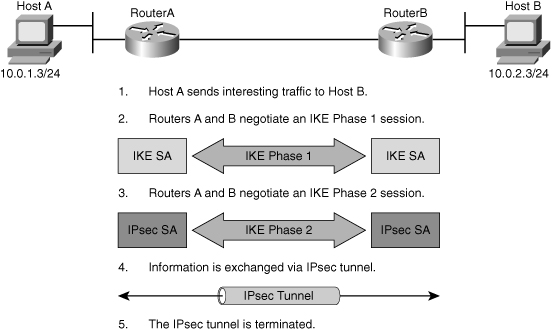
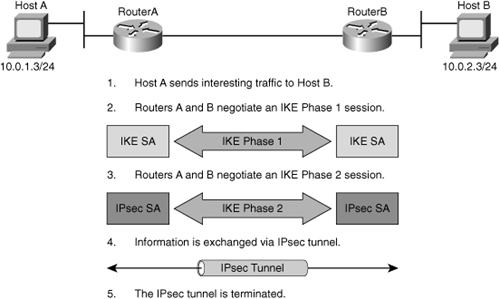
![]() IPsec VPN negotiation can be broken down into five steps, as shown in Figure 5-21, including Phase 1 and Phase 2 of Internet Key Exchange (IKE):
IPsec VPN negotiation can be broken down into five steps, as shown in Figure 5-21, including Phase 1 and Phase 2 of Internet Key Exchange (IKE):
 Configuring IPsec
![]() Follow these steps to configure a site-to-site IPsec VPN:
Follow these steps to configure a site-to-site IPsec VPN:
|
|
|
|
|
|
|
|
|
|
|
|
|
|
|
Site-to-Site IPsec Configuration: Step 1
![]() The first step in configuring Cisco IOS ISAKMP is to ensure that existing ACLs on perimeter routers, firewalls, or other routers do not block IPsec traffic. Perimeter routers typically implement a restrictive security policy with ACLs, where only specific traffic is permitted and all other traffic is denied. Such a restrictive policy blocks IPsec traffic. Therefore, you must add specific permit statements to the ACL to allow IPsec traffic.
The first step in configuring Cisco IOS ISAKMP is to ensure that existing ACLs on perimeter routers, firewalls, or other routers do not block IPsec traffic. Perimeter routers typically implement a restrictive security policy with ACLs, where only specific traffic is permitted and all other traffic is denied. Such a restrictive policy blocks IPsec traffic. Therefore, you must add specific permit statements to the ACL to allow IPsec traffic.
![]() Ensure that your ACLs are configured so that ISAKMP, ESP, and AH traffic is not blocked at interfaces used by IPsec. ISAKMP uses User Datagram Protocol (UDP) port 500. ESP is assigned IP protocol number 50, and AH is assigned IP protocol number 51. In some cases, you might need to add a statement to router ACLs to explicitly permit this traffic. You might need to add the ACL statements to the perimeter router by performing the following steps:
Ensure that your ACLs are configured so that ISAKMP, ESP, and AH traffic is not blocked at interfaces used by IPsec. ISAKMP uses User Datagram Protocol (UDP) port 500. ESP is assigned IP protocol number 50, and AH is assigned IP protocol number 51. In some cases, you might need to add a statement to router ACLs to explicitly permit this traffic. You might need to add the ACL statements to the perimeter router by performing the following steps:
![]() If you have a recent version of the IOS, you might also benefit from the named ACL feature, which is also available for numbered ACLs when it comes to editing your ACL so that you do not have to copy and paste it into an external text editor.
If you have a recent version of the IOS, you might also benefit from the named ACL feature, which is also available for numbered ACLs when it comes to editing your ACL so that you do not have to copy and paste it into an external text editor.
![]() A concatenated example showing ACL entries permitting IPsec traffic for Router A, shown in Figure 5-22, is as follows:
A concatenated example showing ACL entries permitting IPsec traffic for Router A, shown in Figure 5-22, is as follows:
RouterA# show running-config
!
interface Serial0/1
ip address 172.30.1.2 255.255.255.0
ip access-group 102 in
!
access-list 102 permit ahp host 172.30.2.2 host 172.30.1.2
access-list 102 permit esp host 172.30.2.2 host 172.30.1.2
access-list 102 permit udp host 172.30.2.2 host 172.30.1.2 eq isakmp
| Note |
|
Site-to-Site IPsec Configuration: Step 2
![]() The second major step in configuring Cisco IOS ISAKMP support is to define a suite of ISAKMP policies. The goal of defining a suite of IKE policies is to establish ISAKMP peering between two IPsec endpoints.
The second major step in configuring Cisco IOS ISAKMP support is to define a suite of ISAKMP policies. The goal of defining a suite of IKE policies is to establish ISAKMP peering between two IPsec endpoints.
![]() Multiple ISAKMP policies can be configured on each peer participating in IPsec. ISAKMP peers negotiate the acceptable ISAKMP policies before they agree on the SA to use for IPsec.
Multiple ISAKMP policies can be configured on each peer participating in IPsec. ISAKMP peers negotiate the acceptable ISAKMP policies before they agree on the SA to use for IPsec.
![]() Use the crypto isakmp policy command to define an IKE Phase I policy. IKE policies define a set of parameters that IKE uses during negotiation. Use the no form of this command to delete an IKE policy. The command syntax is crypto isakmp policy priority, where priority is a number that uniquely identifies the IKE policy and assigns a priority to the policy. Use an integer from 1 to 10,000, with 1 being the highest priority and 10,000 the lowest.
Use the crypto isakmp policy command to define an IKE Phase I policy. IKE policies define a set of parameters that IKE uses during negotiation. Use the no form of this command to delete an IKE policy. The command syntax is crypto isakmp policy priority, where priority is a number that uniquely identifies the IKE policy and assigns a priority to the policy. Use an integer from 1 to 10,000, with 1 being the highest priority and 10,000 the lowest.
![]() This command invokes the ISAKMP policy configuration (config-isakmp) command mode.
This command invokes the ISAKMP policy configuration (config-isakmp) command mode.
| Note |
|
![]() The crypto isakmp policy command invokes the ISAKMP policy configuration command mode where you can set ISAKMP parameters. If you do not specify one of these commands for a policy, the default value is used for that parameter. Table 5-4 lists the keywords available to specify the parameters in the policy while you are in the config-isakmp command mode, and displays the default value for the parameters that you do not specifically configure.
The crypto isakmp policy command invokes the ISAKMP policy configuration command mode where you can set ISAKMP parameters. If you do not specify one of these commands for a policy, the default value is used for that parameter. Table 5-4 lists the keywords available to specify the parameters in the policy while you are in the config-isakmp command mode, and displays the default value for the parameters that you do not specifically configure.
|
|
|
|
|
|
|---|---|---|---|---|
|
|
|
|
|
|
|
|
| |||
|
|
| |||
|
|
|
|
|
|
|
|
|
|
|
|
|
|
| |||
|
|
|
|
|
|
|
|
| |||
|
|
|
|
|
|
![]() The current default protection suite offers DES, SHA, DH Group 1, RSA signature, and a lifetime of 86,400 seconds with no volume limit.
The current default protection suite offers DES, SHA, DH Group 1, RSA signature, and a lifetime of 86,400 seconds with no volume limit.
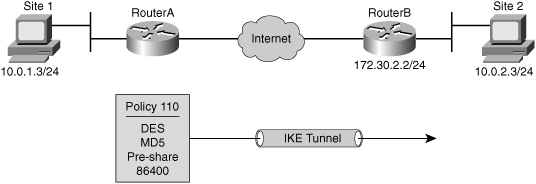
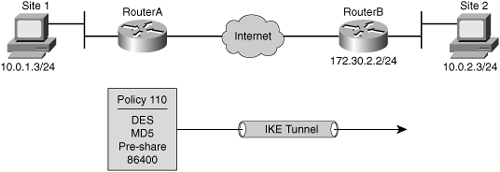
![]() Example 5-1 shows an example of configuration of the ISAKMP (IKE) policies that could be negotiated on Figure 5-23. Table 5-4 lists and describes the parameters for the configuration.
Example 5-1 shows an example of configuration of the ISAKMP (IKE) policies that could be negotiated on Figure 5-23. Table 5-4 lists and describes the parameters for the configuration.
RouterA# configure terminal
RouterA(config)# crypto isakmp policy 110
RouterA(config–isakmp)# authentication pre-share
RouterA(config–isakmp)# encryption des
RouterA(config–isakmp)# group 1
RouterA(config–isakmp)# hash md5
RouterA(config–isakmp)# lifetime 86400
IKE Policy Negotiation
![]() ISAKMP peers negotiate the acceptable ISAKMP policies before they agree on the SA to use for IPsec.
ISAKMP peers negotiate the acceptable ISAKMP policies before they agree on the SA to use for IPsec.
![]() When the ISAKMP negotiation begins in IKE Phase 1 main mode, the following occurs:
When the ISAKMP negotiation begins in IKE Phase 1 main mode, the following occurs:
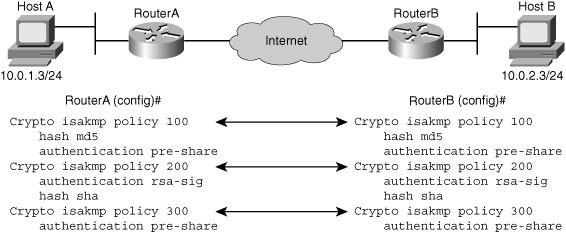
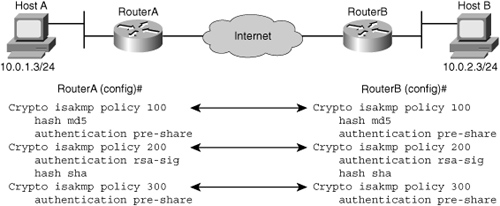
![]() Figure 5-24 shows the negotiation between Router A and Router B and how the first two policies would be successfully negotiated but the last one could not.
Figure 5-24 shows the negotiation between Router A and Router B and how the first two policies would be successfully negotiated but the last one could not.
Configuring Pre-Shared Keys
![]() To configure a PSK, use the crypto isakmp key global configuration command. You must configure this key whenever you specify PSKs in an ISAKMP policy. Use the no form of this command to delete a PSK. The syntax for the command is as follows:
To configure a PSK, use the crypto isakmp key global configuration command. You must configure this key whenever you specify PSKs in an ISAKMP policy. Use the no form of this command to delete a PSK. The syntax for the command is as follows:
crypto isakmp key encryption-type-digit keystring address peer-address
crypto isakmp key encryption-type-digit keystring hostname peer-hostname
![]() Table 5-5 lists the command syntax parameter definitions.
Table 5-5 lists the command syntax parameter definitions.
|
|
|
|---|---|
|
|
|
|
| |
|
| |
|
|
|
|
|
|
|
|
|
| Note |
|
![]() Example 5-2 shows some of ISAKMP and PSK configuration for Router A and Router B in the topology in Figure 5-24. Note that the keystring of cisco1234 matches. The address identity method is specified. The ISAKMP policies are compatible. Default values do not have to be configured.
Example 5-2 shows some of ISAKMP and PSK configuration for Router A and Router B in the topology in Figure 5-24. Note that the keystring of cisco1234 matches. The address identity method is specified. The ISAKMP policies are compatible. Default values do not have to be configured.
RouterA(config)# crypto isakmp key cisco1234 address 172.30.2.2
RouterA(config)# crypto isakmp policy 110
RouterA(config-isakmp)# hash md5
RouterA(config-isakmp)# authentication pre-share
_______________________________________________________________
RouterB(config)# crypto isakmp key cisco1234 address 172.30.1.2
RouterB(config)# crypto isakmp policy 110
RouterB(config-isakmp)# hash md5
RouterB(config-isakmp)# authentication pre-share
Site-to-Site IPsec Configuration: Phase 1
![]() To recapitulate, Example 5-3 shows the comprehensive configuration for Router A and Router B to be successful with the Phase 1 of IPsec.
To recapitulate, Example 5-3 shows the comprehensive configuration for Router A and Router B to be successful with the Phase 1 of IPsec.
RouterA(config)# crypto isakmp policy 110
RouterA(config–isakmp)# authentication pre-share
RouterA(config–isakmp)# encryption des
RouterA(config–isakmp)# group 1
RouterA(config–isakmp)# hash md5
RouterA(config–isakmp)# lifetime 86400
RouterA(config–isakmp)# exit
RouterA(config)# crypto isakmp key cisco1234 address 172.30.2.2
_______________________________________________________________
RouterB(config)# crypto isakmp policy 110
RouterB(config–isakmp)# authentication pre-share
RouterB(config–isakmp)# encryption des
RouterB(config–isakmp)# group 1
RouterB(config–isakmp)# hash md5
RouterB(config–isakmp)# lifetime 86400
RouterB(config–isakmp)# exit
RouterB(config)# crypto isakmp key cisco1234 address 172.30.1.2
| Note |
|
Site-to-Site IPsec Configuration: Step 3
![]() A transform set is a combination of individual IPsec transforms that are designed to enact a specific security policy for data traffic. During the ISAKMP IPsec SA negotiation that occurs in IKE Phase 2 quick mode, the peers agree to use a particular transform set for protecting a particular data flow. Transform sets combine the following IPsec factors:
A transform set is a combination of individual IPsec transforms that are designed to enact a specific security policy for data traffic. During the ISAKMP IPsec SA negotiation that occurs in IKE Phase 2 quick mode, the peers agree to use a particular transform set for protecting a particular data flow. Transform sets combine the following IPsec factors:
-
 Mechanism for payload authentication: AH transform
 -
 Mechanism for payload encryption: ESP transform
 -
 IPsec mode (transport mode versus tunnel mode)
![]() Transform sets are limited to one AH transform, one ESP encryption transform, and one ESP authentication transform. To define a transform set, use the crypto ipsec transform-set global configuration command. To delete a transform set, use the no form of the command. Table 5-6 defines the parameters for the crypto ipsec transform-set command, the syntax for which is as follows:
Transform sets are limited to one AH transform, one ESP encryption transform, and one ESP authentication transform. To define a transform set, use the crypto ipsec transform-set global configuration command. To delete a transform set, use the no form of the command. Table 5-6 defines the parameters for the crypto ipsec transform-set command, the syntax for which is as follows:
crypto ipsec transform-set transform-set-name transform1 [transform2 [transform3]]
|
|
|
|---|---|
|
|
|
|
|
|
![]() Example 5-4 shows an example of a transform set configuration on Router A.
Example 5-4 shows an example of a transform set configuration on Router A.
RouterA(config)# crypto ipsec transform-set mine esp-des
![]() You can configure multiple transform sets and then specify one or more of the transform sets in a crypto map entry. The IPsec SA negotiation uses the transform set that is defined in the crypto map entry to protect the data flows that are specified by the ACL of that crypto map entry. During the negotiation, the peers search for a transform set that has the same criteria at both peers. When such a transform set is found, it is selected and applied to the protected traffic as part of the IPsec SAs of both peers.
You can configure multiple transform sets and then specify one or more of the transform sets in a crypto map entry. The IPsec SA negotiation uses the transform set that is defined in the crypto map entry to protect the data flows that are specified by the ACL of that crypto map entry. During the negotiation, the peers search for a transform set that has the same criteria at both peers. When such a transform set is found, it is selected and applied to the protected traffic as part of the IPsec SAs of both peers.
![]() When ISAKMP is not used to establish SAs, a single transform set must be used. The transform set is not negotiated.
When ISAKMP is not used to establish SAs, a single transform set must be used. The transform set is not negotiated.
Transform Set Negotiation
![]() Transform sets are negotiated during quick mode in IKE Phase 2 using the transform sets that you previously configured. You can configure multiple transform sets and then specify one or more of the transform sets in a crypto map entry. Configure the transforms from the most to the least secure, according to your policy. The IPsec SA negotiation uses the transform set defined in the crypto map entry to protect the data flows that are specified by the ACL of that crypto map entry.
Transform sets are negotiated during quick mode in IKE Phase 2 using the transform sets that you previously configured. You can configure multiple transform sets and then specify one or more of the transform sets in a crypto map entry. Configure the transforms from the most to the least secure, according to your policy. The IPsec SA negotiation uses the transform set defined in the crypto map entry to protect the data flows that are specified by the ACL of that crypto map entry.
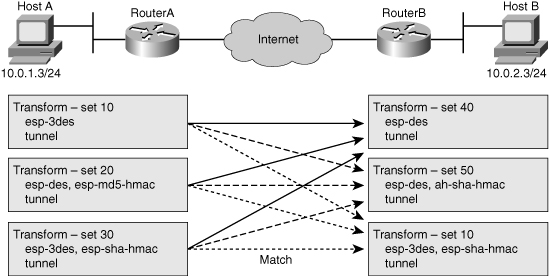
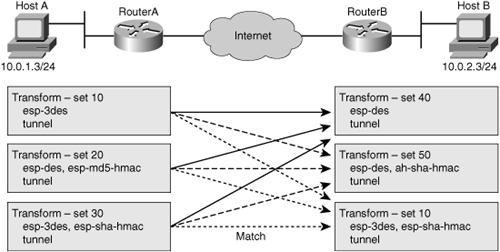
![]() During the negotiation, the peers search for a transform set that is the same at both peers, as shown in Figure 5-25. Each of the Router A transform sets are compared against each of the Router B transform sets in succession. Router A transform sets 10, 20, and 30 are compared with Router B transform set 40. The result is no match. All of Router A transform sets are then compared against Router B transform sets. Finally, Router A transform set 30 matches Router B transform set 60. When such a transform set match is found, it is selected and is applied to the protected traffic as part of the IPsec SAs of both peers. IPsec peers agree on one unidirectional transform proposal per SA.
During the negotiation, the peers search for a transform set that is the same at both peers, as shown in Figure 5-25. Each of the Router A transform sets are compared against each of the Router B transform sets in succession. Router A transform sets 10, 20, and 30 are compared with Router B transform set 40. The result is no match. All of Router A transform sets are then compared against Router B transform sets. Finally, Router A transform set 30 matches Router B transform set 60. When such a transform set match is found, it is selected and is applied to the protected traffic as part of the IPsec SAs of both peers. IPsec peers agree on one unidirectional transform proposal per SA.
| Key Topic |
|
Site-to-Site IPsec Configuration: Step 4
![]() Crypto ACLs perform different functions depending on whether the traffic is inbound or outbound to the interface:
Crypto ACLs perform different functions depending on whether the traffic is inbound or outbound to the interface:
-
 Outbound: Selects outbound traffic that IPsec should protect. Traffic that is not selected is sent in plaintext.
 -
 Inbound: If desired, you can create inbound ACLs to filter and discard traffic that should have been protected by IPsec.
![]() The crypto ACLs identify the traffic flows that should be protected. Extended IP ACLs select IP traffic to encrypt based on protocol, IP address, network, subnet, and port. Although the ACL syntax is unchanged from extended IP ACLs, the meanings differ slightly for crypto ACLs. That is, permit specifies that matching packets must be encrypted, and deny specifies that matching packets should not be encrypted. Crypto ACLs behave similarly to an extended IP ACL that is applied to outbound traffic on an interface.
The crypto ACLs identify the traffic flows that should be protected. Extended IP ACLs select IP traffic to encrypt based on protocol, IP address, network, subnet, and port. Although the ACL syntax is unchanged from extended IP ACLs, the meanings differ slightly for crypto ACLs. That is, permit specifies that matching packets must be encrypted, and deny specifies that matching packets should not be encrypted. Crypto ACLs behave similarly to an extended IP ACL that is applied to outbound traffic on an interface.
![]() Table 5-7 defines the parameters for the access-list command used for extended IP ACLs, the basic syntax for which is as follows:
Table 5-7 defines the parameters for the access-list command used for extended IP ACLs, the basic syntax for which is as follows:
access-list access-list-number { permit | deny } protocol source source-wildcard
destination destination-wildcard
|
|
|
|---|---|
|
|
|
|
|
|
|
|
|
|
|
|
| Key Topic |
|
| Note |
|
![]() Any unprotected inbound traffic that matches a permit entry in the crypto ACL for a crypto map entry that is flagged as IPsec is dropped. This drop occurs because this traffic was expected to be protected by IPsec.
Any unprotected inbound traffic that matches a permit entry in the crypto ACL for a crypto map entry that is flagged as IPsec is dropped. This drop occurs because this traffic was expected to be protected by IPsec.
![]() If you want certain traffic to receive one combination of IPsec protection (authentication only) and other traffic to receive a different combination (both authentication and encryption), create two different crypto ACLs to define the two different types of traffic. Different crypto map entries then use these different ACLs to specify different IPsec policies.
If you want certain traffic to receive one combination of IPsec protection (authentication only) and other traffic to receive a different combination (both authentication and encryption), create two different crypto ACLs to define the two different types of traffic. Different crypto map entries then use these different ACLs to specify different IPsec policies.
| Caution |
|
![]() Try to be as restrictive as possible when defining which packets to protect in a crypto ACL. If you must use the any keyword in a permit statement, you must preface that statement with a series of deny statements to filter out any traffic (that would otherwise fall within that permit statement) that you do not want to be protected.
Try to be as restrictive as possible when defining which packets to protect in a crypto ACL. If you must use the any keyword in a permit statement, you must preface that statement with a series of deny statements to filter out any traffic (that would otherwise fall within that permit statement) that you do not want to be protected.
Configuring Symmetric Peer Crypto ACLS
![]() You must configure symmetric crypto ACLs for use by IPsec. Both inbound and outbound traffic are evaluated against the same outbound IPsec ACL. The ACL criteria are applied in the forward direction to traffic exiting your router, and the reverse direction to traffic entering your router. When a router receives encrypted packets back from an IPsec peer, it uses the same ACL to determine which inbound packets to decrypt by viewing the source and destination addresses in the ACL in reverse order.
You must configure symmetric crypto ACLs for use by IPsec. Both inbound and outbound traffic are evaluated against the same outbound IPsec ACL. The ACL criteria are applied in the forward direction to traffic exiting your router, and the reverse direction to traffic entering your router. When a router receives encrypted packets back from an IPsec peer, it uses the same ACL to determine which inbound packets to decrypt by viewing the source and destination addresses in the ACL in reverse order.
![]() The example shown in Figure 5-26 illustrates why symmetric ACLs are recommended.
The example shown in Figure 5-26 illustrates why symmetric ACLs are recommended.
![]() For site 1, IPsec protection is applied to traffic between hosts on the 10.0.1.0 network as the data exits the Router A S0/1 interface in route to site 2 hosts on the 10.0.2.0 network. For traffic from site 1 hosts on the 10.0.1.0 network to site 2 hosts on the 10.0.2.0 network, the ACL entry on Router A is evaluated as follows:
For site 1, IPsec protection is applied to traffic between hosts on the 10.0.1.0 network as the data exits the Router A S0/1 interface in route to site 2 hosts on the 10.0.2.0 network. For traffic from site 1 hosts on the 10.0.1.0 network to site 2 hosts on the 10.0.2.0 network, the ACL entry on Router A is evaluated as follows:
-
 Source = Hosts on 10.0.1.0 network
 -
 Destination = Hosts on 10.0.2.0 network
![]() For incoming traffic from site 2 hosts on the 10.0.2.0 network to site 1 hosts on the 10.0.1.0 network, that same ACL entry on Router A is evaluated as follows:
For incoming traffic from site 2 hosts on the 10.0.2.0 network to site 1 hosts on the 10.0.1.0 network, that same ACL entry on Router A is evaluated as follows:
-
 Source = Hosts on 10.0.2.0 network
 -
 Destination = Hosts on 10.0.1.0 network
| Key Topic |
|
Site-to-Site IPsec Configuration: Step 5
![]() Crypto map entries that you create for IPsec combine the needed configuration parameters of IPsec SAs, including the following parameters:
Crypto map entries that you create for IPsec combine the needed configuration parameters of IPsec SAs, including the following parameters:
-
 What traffic should be protected by IPsec, using a crypto ACL
 -
 The granularity of the flow to be protected by a set of SAs
 -
 Who the remote IPsec peer is, which determines where the IPsec-protected traffic is sent
 -
 The local address that is to be used for the IPsec traffic (optional)
 -
 What IPsec security should be applied to this traffic, choosing from a list of one or more transform sets
![]() Crypto map entries with the same crypto map name, but different map sequence numbers, are grouped into a crypto map set.
Crypto map entries with the same crypto map name, but different map sequence numbers, are grouped into a crypto map set.
![]() You can apply only one crypto map set to a single interface. Multiple interfaces can share the same crypto map set if you want to apply the same policy to multiple interfaces. If you create more than one crypto map entry for a given interface, use the sequence number (seq-num) of each map entry to rank the map entries. The lower the seq-num, the higher the priority. At the interface that has the crypto map set, traffic is evaluated against higher-priority map entries first.
You can apply only one crypto map set to a single interface. Multiple interfaces can share the same crypto map set if you want to apply the same policy to multiple interfaces. If you create more than one crypto map entry for a given interface, use the sequence number (seq-num) of each map entry to rank the map entries. The lower the seq-num, the higher the priority. At the interface that has the crypto map set, traffic is evaluated against higher-priority map entries first.
![]() You must create multiple crypto map entries for a given interface if any of these conditions exist:
You must create multiple crypto map entries for a given interface if any of these conditions exist:
-
 Different data flows are to be handled by separate IPsec peers.
 -
 You want to apply different IPsec security to different types of traffic (to the same or separate IPsec peers); for example, if you want traffic between one set of subnets to be authenticated, and traffic between another set of subnets to be both authenticated and encrypted. In this case, the different types of traffic should be defined in two separate ACLs, and you must create a separate crypto map entry for each crypto ACL.
 -
 You are not using IKE to establish a particular set of SAs, and you want to specify multiple ACL entries, you must create separate ACLs (one per permit entry) and specify a separate crypto map entry for each ACL. Although it is possible to establish SAs manually, it is not recommended because the keys never expire. The longer a key is in production, the more vulnerable it becomes.
![]() Use the crypto map global configuration command, explained in Table 5-8, to create or modify a crypto map entry and enter the crypto map configuration mode. Set the crypto map entries that reference dynamic maps to the lowest priority in a crypto map set (that is, they should have the highest sequence numbers). Use the no form of this command to delete a crypto map entry or set. The command syntax and parameter definitions are as follows:
Use the crypto map global configuration command, explained in Table 5-8, to create or modify a crypto map entry and enter the crypto map configuration mode. Set the crypto map entries that reference dynamic maps to the lowest priority in a crypto map set (that is, they should have the highest sequence numbers). Use the no form of this command to delete a crypto map entry or set. The command syntax and parameter definitions are as follows:
    crypto map map-name seq-num cisco
   crypto map map-name seq-num ipsec-manual
   crypto map map-name seq-num ipsec-isakmp [dynamic dynamic-map-name]
   no crypto map map-name [seq-num]
|
|
|
|---|---|
|
|
|
|
|
|
|
|
|
|
|
|
|
|
|
|
|
|
|
|
|
![]() Use the crypto map command in crypto map configuration mode, to define the crypto map entries, with the commands shown in the Table 5-9.
Use the crypto map command in crypto map configuration mode, to define the crypto map entries, with the commands shown in the Table 5-9.
|
|
|
|---|---|
|
|
|
|
|
|
|
|
|
|
|
|
|
|
|
|
|
|
|
|
|
|
|
|
![]() After you define the crypto map entries, you can assign the crypto map set to interfaces using the crypto map (interface configuration) command.
After you define the crypto map entries, you can assign the crypto map set to interfaces using the crypto map (interface configuration) command.
| Note |
|
![]() Figure 5-27 illustrates a topology in which two peers are specified for redundancy, as configured by the crypto map in Example 5-5. If the first peer cannot be contacted, the second peer is used. There is no limit to the number of redundant peers you can configure.
Figure 5-27 illustrates a topology in which two peers are specified for redundancy, as configured by the crypto map in Example 5-5. If the first peer cannot be contacted, the second peer is used. There is no limit to the number of redundant peers you can configure.
RouterA(config)# crypto map mymap 10 ipsec-isakmp
RouterA(config-crypto-map)# match address 110
RouterA(config-crypto-map)# set peer 172.30.2.2
RouterA(config-crypto-map)# set peer 172.30.3.2
RouterA(config-crypto-map)# set pfs group1
RouterA(config-crypto-map)# set tranform-set mine
RouterA(config-crypto-map)# set security-association lifetime seconds 86400
Applying Crypto Maps to Interfaces
![]() In this step, you apply the crypto map to the outgoing interface of the VPN tunnel using the crypto map command in interface configuration mode. Use the no form of the command to remove the crypto map set from the interface. The command syntax is crypto map map-name, where map-name is the name of the crypto map set to apply to the interface.
In this step, you apply the crypto map to the outgoing interface of the VPN tunnel using the crypto map command in interface configuration mode. Use the no form of the command to remove the crypto map set from the interface. The command syntax is crypto map map-name, where map-name is the name of the crypto map set to apply to the interface.
![]() Also, make sure that you configure the routing information that is needed to send packets into the tunnel.
Also, make sure that you configure the routing information that is needed to send packets into the tunnel.
![]() All IP traffic passing through the interface where the crypto map is applied is evaluated against the applied crypto map set. If a crypto map entry sees outbound IP traffic that should be protected and the crypto map specifies the use of IKE, an SA is negotiated with the remote peer according to the parameters that are included in the crypto map entry.
All IP traffic passing through the interface where the crypto map is applied is evaluated against the applied crypto map set. If a crypto map entry sees outbound IP traffic that should be protected and the crypto map specifies the use of IKE, an SA is negotiated with the remote peer according to the parameters that are included in the crypto map entry.
![]() Example 5-6 demonstrates how to apply a crypto map.
Example 5-6 demonstrates how to apply a crypto map.
 Verifying the IPsec Configuration
![]() You can use the Cisco IOS commands explained in Table 5-10 to verify the VPN configuration.
You can use the Cisco IOS commands explained in Table 5-10 to verify the VPN configuration.
|
|
|
|---|---|
|
|
|
|
|
|
|
|
|
|
|
|
|
|
|
|
|
|
|
|
|
show crypto isakmp policy Command
![]() Use the show crypto isakmp policy command to display configured IKE policies and the default IKE policy settings. This command, shown in Example 5-7, is useful because it reveals your ISAKMP (IKE) configuration all with one command.
Use the show crypto isakmp policy command to display configured IKE policies and the default IKE policy settings. This command, shown in Example 5-7, is useful because it reveals your ISAKMP (IKE) configuration all with one command.
RouterA# show crypto isakmp policy
Protection suite of priority 110
     encryption algorithm:   3DES - Data Encryption Standard (168 bit keys).
     hash algorithm:          Secure Hash Standard
     authentication method:  preshared
     Diffie-Hellman group:   #2 (1024 bit)
     lifetime:                86400 seconds, no volume limit
Default protection suite
     encryption algorithm:   DES - Data Encryption Standard (56 bit keys).
     hash algorithm:          Secure Hash Standard
     authentication method:  Rivest-Shamir-Adleman Signature
     Diffie-Hellman group:   #1 (768 bit)
    lifetime:               86400 seconds, no volume limit
show crypto ipsec transform-set Command
![]() You can use the show crypto ipsec transform-set command, shown in Example 5-8, to show all the configured transform sets. Because transform sets determine the level of protection that your data will have as it is tunneled, it is important to verify the strength of your IPsec protection policy.
You can use the show crypto ipsec transform-set command, shown in Example 5-8, to show all the configured transform sets. Because transform sets determine the level of protection that your data will have as it is tunneled, it is important to verify the strength of your IPsec protection policy.
RouterA# show crypto ipsec transform-set
Transform set AES_SHA: { esp-128-aes esp-sha-hmac }
   will negotiate = { Tunnel,  },
show crypto map Command
![]() To see all the configured crypto maps, use the show crypto map command, shown in Example 5-9. This command verifies configurations and shows the SA lifetime. The show running-config command reveals many of these same settings.
To see all the configured crypto maps, use the show crypto map command, shown in Example 5-9. This command verifies configurations and shows the SA lifetime. The show running-config command reveals many of these same settings.
RouterA# show crypto map
Crypto Map "mymap" 10 ipsec-isakmp
        Peer = 172.30.2.2
        Extended IP access list 102
              access-list 110 permit ip host 10.0.1.3 host 10.0.2.3
        Current peer: 172.30.2.2
        Security association lifetime: 4608000 kilobytes/3600 seconds
        PFS (Y/N): N
       Transform sets={ mine, }
show crypto ipsec sa Command
![]() One of the more useful commands is show crypto ipsec sa, shown in Example 5-10. The output of Example 5-10 relates to the topology of Figure 5-28.
One of the more useful commands is show crypto ipsec sa, shown in Example 5-10. The output of Example 5-10 relates to the topology of Figure 5-28.
![]() When you see that an SA has been established, it indicates that the rest of the configuration is working. Make special note of the pkts encrypt and pkts decrypt values because they indicate that traffic is flowing through the tunnel.
When you see that an SA has been established, it indicates that the rest of the configuration is working. Make special note of the pkts encrypt and pkts decrypt values because they indicate that traffic is flowing through the tunnel.
RouterA# show crypto ipsec sa
Interface: Serial0/1
         Crypto map tag: mymap, local addr. 172.30.1.2
         local ident (addr/mask/prot/port): (172.30.1.2/255.255.255.255/0/0)
       remote ident (addr/mask/prot/port): (172.30.2.2/255.255.255.255/0/0)
       current_peer: 172.30.2.2
        PERMIT, flacs={origin_is_acl,}
       #pkts encaps: 21, #pkts encrypt: 21, #pkts digest 0
       #pkts decaps: 21, #pkts decrypt: 21, #pkts verify 0
       #send errors 0, #recv errors 0
    local crypto endpt.: 172.30.1.2, remote crypto endpt.: 172.30.2.2
    path mtu 1500, media mtu 1500
    current outbound spi: 8AE1C9C
![]() The debug crypto isakmp and debug crypto sa commands are discussed later in the section “Troubleshooting.”
The debug crypto isakmp and debug crypto sa commands are discussed later in the section “Troubleshooting.”





0 comments
Post a Comment