Locking Down the Router
![]() Cisco routers are initially deployed with services that are enabled by default. This section discusses the Cisco configuration settings that you should consider changing on your routers, especially on your perimeter routers, to improve security. The list of configuration settings discussed is not exhaustive, and it cannot be substituted for understanding on your part; it is meant to be a reminder of some of the things that are sometimes forgotten. Many of the services that you can enable on Cisco routers require careful security configuration. However, this section describes services that are enabled by default, or that are almost always enabled by users, and that might need to be disabled.
Cisco routers are initially deployed with services that are enabled by default. This section discusses the Cisco configuration settings that you should consider changing on your routers, especially on your perimeter routers, to improve security. The list of configuration settings discussed is not exhaustive, and it cannot be substituted for understanding on your part; it is meant to be a reminder of some of the things that are sometimes forgotten. Many of the services that you can enable on Cisco routers require careful security configuration. However, this section describes services that are enabled by default, or that are almost always enabled by users, and that might need to be disabled.
![]() Consideration of these services is particularly important because some of the default settings in Cisco IOS Software are there for historical reasons; they made sense when they were chosen but would probably be different if new defaults were chosen today. Other defaults make sense for most systems but can create security exposures if they are used in devices that form part of a network perimeter defense. Still, other defaults are actually required by standards but are not always desirable from a security point of view.
Consideration of these services is particularly important because some of the default settings in Cisco IOS Software are there for historical reasons; they made sense when they were chosen but would probably be different if new defaults were chosen today. Other defaults make sense for most systems but can create security exposures if they are used in devices that form part of a network perimeter defense. Still, other defaults are actually required by standards but are not always desirable from a security point of view.
 Vulnerable Router Services and Interfaces
![]() Cisco routers support many network services that may not be required in certain enterprise networks. The services that are listed here have been chosen for their vulnerability to malicious exploitation. These are the router services most likely to be used in network attacks. For ease of learning, the services are grouped as follows:
Cisco routers support many network services that may not be required in certain enterprise networks. The services that are listed here have been chosen for their vulnerability to malicious exploitation. These are the router services most likely to be used in network attacks. For ease of learning, the services are grouped as follows:
-
 Disable unnecessary services and interfaces
 -
 Router interfaces: You should limit unauthorized access to the router and the network by disabling unused open router interfaces.
 -
 Bootstrap Protocol (BOOTP) server: This service is enabled by default. This service allows a router to act as a BOOTP server for other routers. This service is rarely required and should be disabled.
 -
 Cisco Discovery Protocol: This service is enabled by default. Cisco Discovery Protocol is used primarily to obtain protocol addresses of neighboring Cisco devices and to discover the platforms of those devices. Cisco Discovery Protocol is media and protocol independent and runs on most equipment manufactured by Cisco, including routers, access servers, switches, and IP phones. This service should be disabled globally or on a per-interface basis if it is not required.
 -
 Configuration autoloading: This service is disabled by default. Autoloading of configuration files from a network server should remain disabled when not in use by the router.
 -
 FTP server: This service is disabled by default. The FTP server enables you to use your router as an FTP server for FTP client requests. Because it allows access to certain files in the router flash memory, this service should be disabled when it is not required.
 -
 TFTP server: This service is disabled by default. The TFTP server enables you to use your router as a TFTP server for TFTP clients. This service should be disabled when it is not in use, because it allows access to certain files in the router flash memory.
 -
 Network Time Protocol (NTP) service: This service is disabled by default. When NTP is enabled, the router acts as a time server for other network devices. If NTP is configured unsecurely, an attacker can use it to corrupt the router clock and potentially the clock of other devices that learn time from the router. Correct time is essential for setting proper time stamps for IPsec encryption services, log data, and diagnostic and security alerts. If this service is used, restrict which devices have access to NTP. Disable this service when it is not required.
 -
 Packet Assembler/Disassembler (PAD) service: This service is enabled by default. The PAD service allows access to X.25 PAD commands when forwarding X.25 packets. This service should be explicitly disabled when not in use.
 -
 TCP and UDPminor services: These services are enabled in Cisco IOS Software before Release 11.3 and disabled in Cisco IOS Software Release 11.3 and later. The minor services are provided by small servers (daemons) running in the router. They are potentially useful for diagnostics but are rarely used. Disable this service explicitly.
 -
 Maintenance Operation Protocol (MOP) service: This service is enabled on most Ethernet interfaces. MOP is a Digital Equipment Corp. (DEC) maintenance protocol that should be explicitly disabled when it is not in use.
-
-
 Disable and restrict commonly configured management services
 -
 SNMP: This service is enabled by default. The SNMP service allows the router to respond to remote SNMP queries and configuration requests. If required, restrict which SNMP systems have access to the router SNMP agent and use SNMPv3 whenever possible, because this version offers secure communication not available in earlier versions of SNMP. Disable this service when it is not required.
 -
 HTTP or HTTPS configuration and monitoring: The default setting for this service is Cisco device dependent. This service allows the router to be monitored or have its configuration modified from a web browser via an application such as the Cisco SDM. You should disable this service if it is not required. If this service is required, restrict access to the router HTTP or HTTPS service using ACLs.
 -
 DNS: This client service is enabled by default. By default, Cisco routers broadcast name requests to 255.255.255.255. Restrict this service by disabling it when it is not required. If the DNS lookup service is required, ensure that you set the DNS server address explicitly.
-
-
 Ensure path integrity
 -
 Internet Control Message Protocol (ICMP) redirects: This service is enabled by default. ICMP redirects cause the router to send ICMP redirect messages whenever the router is forced to resend a packet through the same interface on which it was received. Attackers can use this information to redirect packets to an untrusted device. This service should be disabled when it is not required.
 -
 IP source routing: This service is enabled by default. The IP protocol supports source routing options that allow the sender of an IP datagram to control the route that a datagram will take toward its ultimate destination and, generally, the route that any reply will take. An attacker can exploit these options to bypass the intended routing path and security of the network. Also, some older IP implementations do not process source-routed packets properly, and it may be possible to crash machines running these implementations by sending datagrams with source routing options. Disable this service when it is not required.
-
-
 Disable probes and scans
 -
 Finger service: This service is enabled by default. The finger protocol (port 79) allows users throughout the network to obtain a list of the users currently using a particular device. The information that is displayed includes the processes running on the system, the line number, connection name, idle time, and terminal location. This information is provided through the Cisco IOS Software show users EXEC command. This command will also display the usernames of those that authenticate via AAA. Unauthorized persons can use this information for reconnaissance attacks. Disable this service when it is not required.
 -
 ICMP unreachable notifications: This service is enabled by default. This service notifies senders of invalid destination IP networks or specific IP addresses. This information can be used to map networks and should be explicitly disabled on interfaces to untrusted networks.
 -
 ICMP mask reply: This service is disabled by default. When this service is enabled, this service tells the router to respond to ICMP mask requests by sending ICMP mask reply messages containing the interface IP address mask. This information can be used to map the network, and this service should be explicitly disabled on interfaces to untrusted networks.
-
-
 Ensure terminal access security
 -
 IP identification service: This service is enabled by default. The identification protocol (specified in RFC 1413, Identification Protocol) reports the identity of a TCP connection initiator to the receiving host. An attacker can use this data to gather information about your network, and this service should be explicitly disabled.
 -
 TCP keepalives: This service is disabled by default. TCP keepalives help “clean up” TCP connections where a remote host has rebooted or otherwise stopped processing TCP traffic. Keepalives should be enabled globally to manage TCP connections and prevent certain DoS attacks.
-
-
 Disable gratuitous and proxy Address Resolution Protocol (ARP)
 -
 Gratuitous ARP (GARP): This service is enabled by default. GARP is the main mechanism that is used in ARP poisoning attacks. You should disable gratuitous ARPs on each router interface unless this service is needed.
 -
 Proxy ARP: This service is enabled by default. This feature configures the router to act as a proxy for Layer 2 address resolution. You should disable this service unless the router is being used as a LAN bridge.
-
-
 Disable IP-directed broadcast
![]() This service is enabled in Cisco IOS Software before Release 12.0 and is disabled in Cisco IOS Software Release 12.0 and later. IP-directed broadcasts are used in the common and popular Smurf DoS attacks and other related attacks. You should disable this service when it is not required.
This service is enabled in Cisco IOS Software before Release 12.0 and is disabled in Cisco IOS Software Release 12.0 and later. IP-directed broadcasts are used in the common and popular Smurf DoS attacks and other related attacks. You should disable this service when it is not required.
 Management Service Vulnerabilities
![]() SNMP is a network protocol that provides a facility for managing the network devices through an NMS. SNMP is widely used for router monitoring and is frequently used for making changes to a router configuration. However, SNMPv1, which is the most commonly used version of SNMP, is often a security risk for the following reasons:
SNMP is a network protocol that provides a facility for managing the network devices through an NMS. SNMP is widely used for router monitoring and is frequently used for making changes to a router configuration. However, SNMPv1, which is the most commonly used version of SNMP, is often a security risk for the following reasons:
-
 SNMPv1 and SNMPv2 use authentication strings called community strings, which are stored and sent across the network in plaintext. Most SNMP implementations send these strings repeatedly as part of periodic polling.
 -
 SNMPv1 is easily spoofed.
![]() Because SNMP can retrieve a copy of the network routing table, and other sensitive network information, it is recommended that you disable SNMPv1 and SNMPv2 if your network does not require it, or use SNMPv3, which has much stronger security mechanisms.
Because SNMP can retrieve a copy of the network routing table, and other sensitive network information, it is recommended that you disable SNMPv1 and SNMPv2 if your network does not require it, or use SNMPv3, which has much stronger security mechanisms.
![]() Most Cisco IOS Software releases support remote configuration and monitoring using HTTP. The authentication protocol that HTTP uses sends a plaintext password across the network. With HTTPS, the session data is encrypted. Cisco SDM uses either HTTP or HTTPS. Access to the HTTP and HTTPS service should be limited by configuring an access class that allows access only to directly connected nodes.
Most Cisco IOS Software releases support remote configuration and monitoring using HTTP. The authentication protocol that HTTP uses sends a plaintext password across the network. With HTTPS, the session data is encrypted. Cisco SDM uses either HTTP or HTTPS. Access to the HTTP and HTTPS service should be limited by configuring an access class that allows access only to directly connected nodes.
![]() By default, the Cisco router DNS lookup service sends name queries to the 255.255.255.255 broadcast address. Using this broadcast address should be avoided because it can allow an attacker to emulate one of your DNS servers and respond to router queries with erroneous data. The DNS lookup service is enabled by default. If your routers must use this service, ensure that you explicitly set the IP address of your DNS servers in the router configuration.
By default, the Cisco router DNS lookup service sends name queries to the 255.255.255.255 broadcast address. Using this broadcast address should be avoided because it can allow an attacker to emulate one of your DNS servers and respond to router queries with erroneous data. The DNS lookup service is enabled by default. If your routers must use this service, ensure that you explicitly set the IP address of your DNS servers in the router configuration.
![]() By default, Telnet sends authentication and commands in plaintext. SSH allows a management connection that is secure and encrypted. Whenever possible you should use SSH rather than Telnet to manage your Cisco routers.
By default, Telnet sends authentication and commands in plaintext. SSH allows a management connection that is secure and encrypted. Whenever possible you should use SSH rather than Telnet to manage your Cisco routers.
 Performing a Security Audit
![]() Security Audit is a feature that examines your existing router configurations and then updates your router to make your router and network more secure. Security Audit is based on the Cisco IOS AutoSecure feature; Security Audit performs checks on, and assists in, the configuration of almost all of the Cisco AutoSecure functions.
Security Audit is a feature that examines your existing router configurations and then updates your router to make your router and network more secure. Security Audit is based on the Cisco IOS AutoSecure feature; Security Audit performs checks on, and assists in, the configuration of almost all of the Cisco AutoSecure functions.
| Note |
|
![]() Security Audit operates in one of two modes, as shown in Figure 2-43:
Security Audit operates in one of two modes, as shown in Figure 2-43:
-
 Security Audit: A wizard that enables you to choose which potential security-related configuration changes to implement on your router
 -
 One-Step Lockdown: Automatically makes all recommended security-related configuration changes
Performing a Security Audit with the Security Audit Wizard
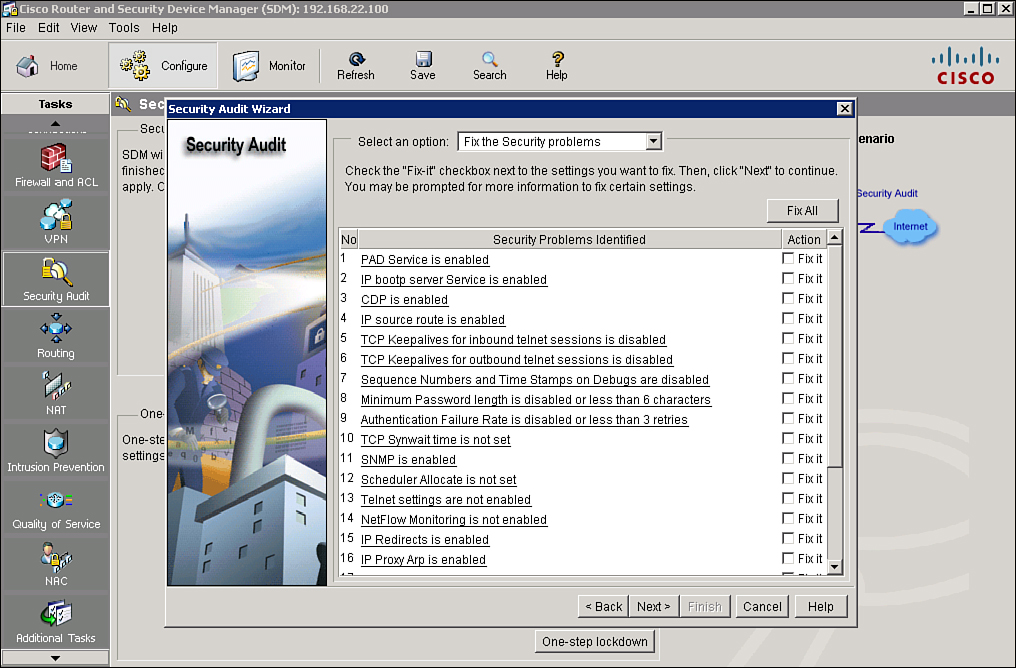
![]() The Security Audit Wizard tests your router configuration to determine whether any potential security problems exist in the configuration, and then presents you with a screen that lets you determine which of those security problems you want to fix. Once you determine which security problems to fix, the Security Audit Wizard makes the necessary changes to the router configuration to fix those problems.
The Security Audit Wizard tests your router configuration to determine whether any potential security problems exist in the configuration, and then presents you with a screen that lets you determine which of those security problems you want to fix. Once you determine which security problems to fix, the Security Audit Wizard makes the necessary changes to the router configuration to fix those problems.
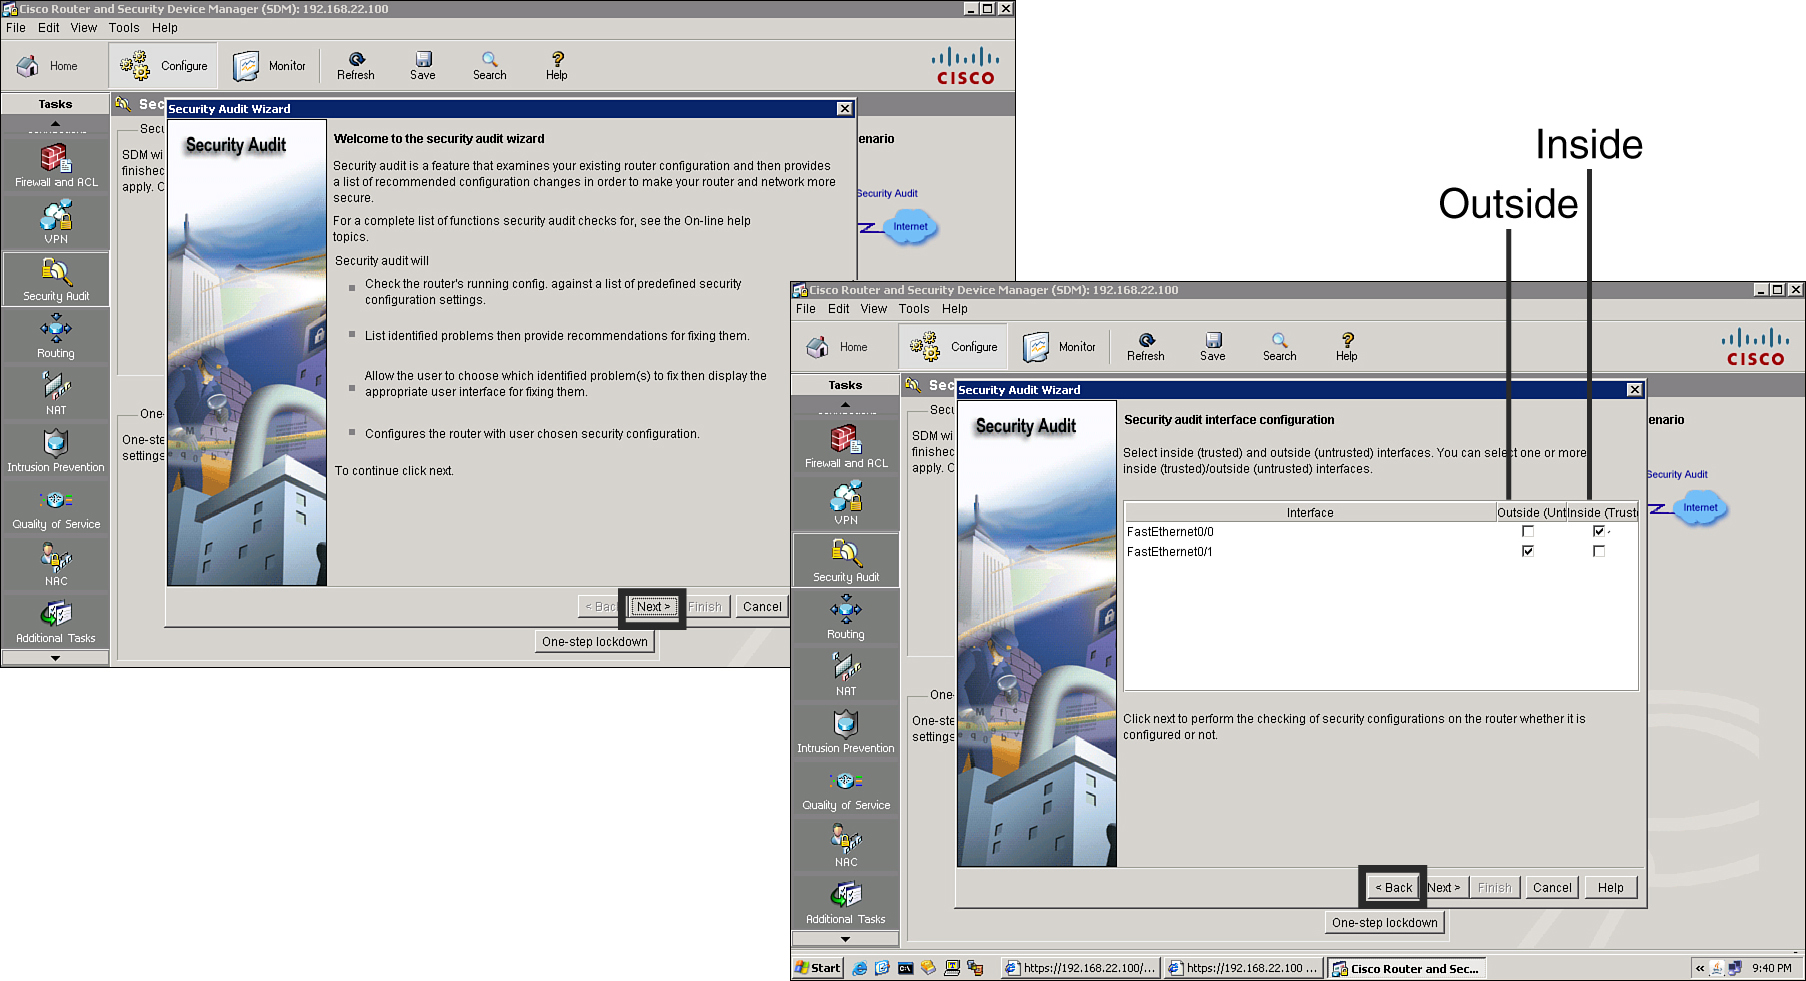
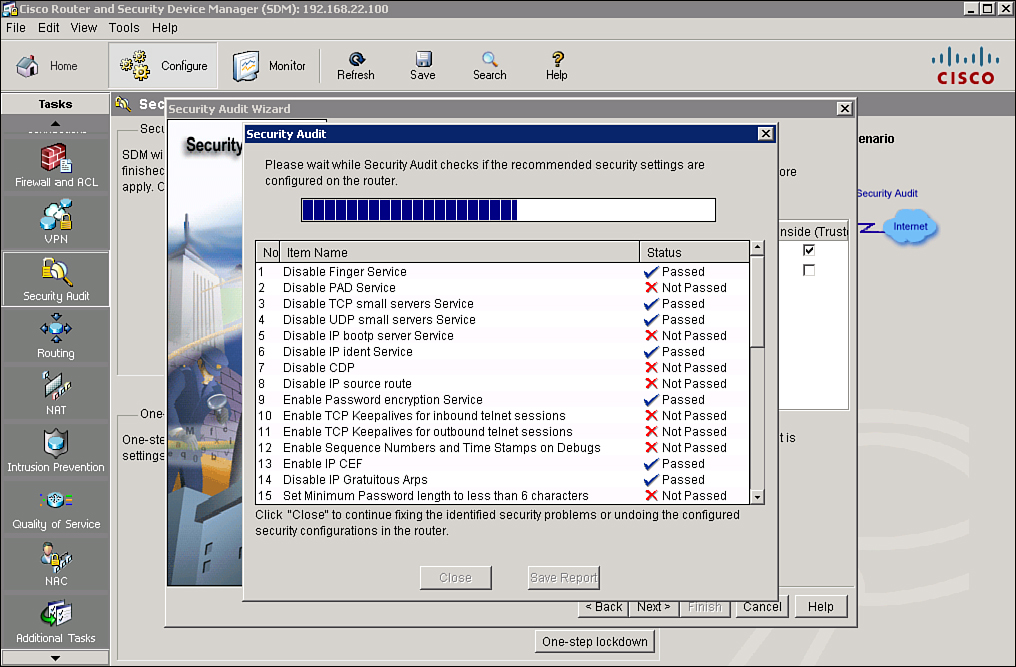
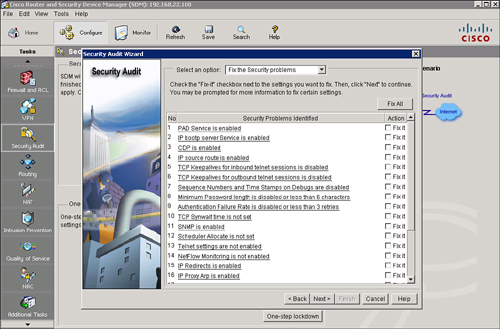
![]() Follow these steps, shown in Figure 2-44, to perform a security audit:
Follow these steps, shown in Figure 2-44, to perform a security audit:
|
|
|
|
|
|
|
|
|
|
|
|
|
|
|
|
|
|
|
|
|
|
|
|
|
|
|
|
|
|
|
|
|
Configuring One-Step Cisco Router Lockdown
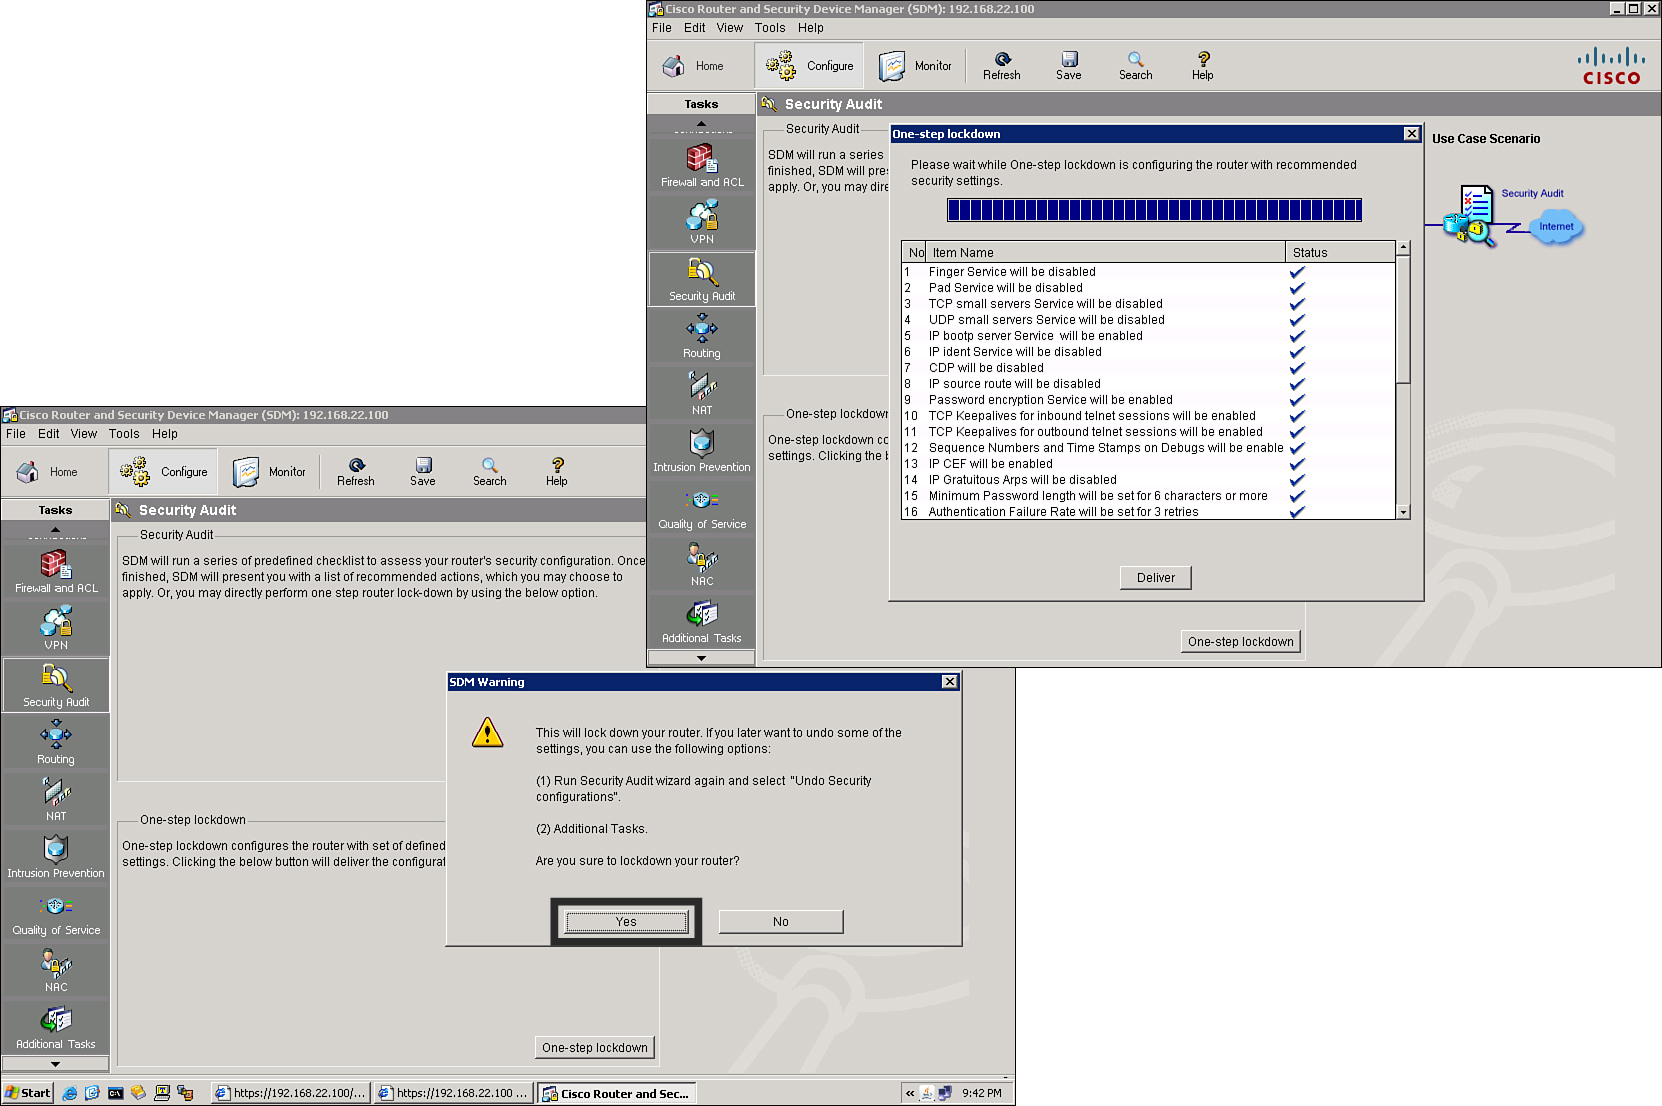
![]() The One-Step Lockdown feature tests your router configuration for any potential security problems and automatically makes the necessary configuration changes to correct any problems that were found.
The One-Step Lockdown feature tests your router configuration for any potential security problems and automatically makes the necessary configuration changes to correct any problems that were found.
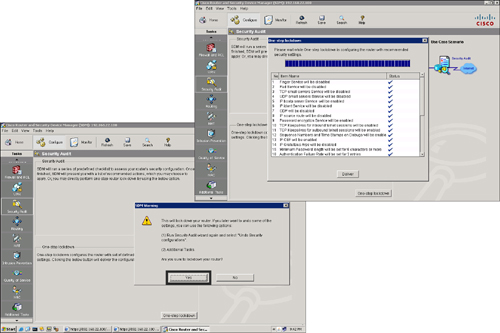
![]() Follow these steps to perform a one-step lockdown, shown in Figure 2-47:
Follow these steps to perform a one-step lockdown, shown in Figure 2-47:
|
|
|
|
|
|
|
|
|
|
|
|
|
|
|
![]() The One-Step Lockdown feature checks for and, if necessary, corrects the following items:
The One-Step Lockdown feature checks for and, if necessary, corrects the following items:
-
 Disable finger service
 -
 Disable TCP small servers service
 -
 Disable UDP small servers service
 -
 Disable IP BOOTP server service
 -
 Disable IP identification service
 -
 Disable Cisco Discovery Protocol
 -
 Disable IP source route
 -
 Enable password encryption service
 -
 Enable TCP keepalives for inbound Telnet sessions
 -
 Enable TCP keepalives for outbound Telnet sessions
 -
 Enable sequence numbers and time stamps on debugs
 -
 Enable IP Cisco Express Forwarding
 -
 Disable IP GARPs
 -
 Set minimum password length to less than six characters
 -
 Set authentication failure rate to less than three retries
 -
 Set TCP synwait time
 -
 Set banner
 -
 Set enable secret password
 -
 Disable SNMP
 -
 Set scheduler interval
 -
 Set scheduler allocate
 -
 Set users
 -
 Enable Telnet settings
 -
 Enable NetFlow switching
 -
 Disable IP redirects
 -
 Disable IP proxy ARP
 -
 Disable IP directed broadcast
 -
 Disable MOP service
 -
 Disable IP unreachables
 -
 Disable IP mask reply
 -
 Disable IP unreachables on null interface
 -
 Enable Unicast Reverse Path Forwarding (RPF) on outside interfaces
 -
 Enable firewall on all of the outside interfaces
 -
 Set access class on HTTP server service
 -
 Set access class on vty lines
 -
 Enable SSH for access to the router
 -
 Enable AAA
| Note |
|
 Cisco AutoSecure
![]() Cisco AutoSecure is a Cisco IOS feature that lets you more easily configure security features on your router, so that your network is better protected. You can configure Cisco AutoSecure from the privileged EXEC mode using the auto secure command in one of two modes:
Cisco AutoSecure is a Cisco IOS feature that lets you more easily configure security features on your router, so that your network is better protected. You can configure Cisco AutoSecure from the privileged EXEC mode using the auto secure command in one of two modes:
-
 Interactive mode: This mode prompts the user with options to enable and disable services and other security features. This is the default mode.
 -
 Noninteractive mode: This mode automatically executes the Cisco auto secure command with the recommended Cisco default settings. This mode is enabled with the no-interact command option.
![]() Example 2-33 shows an abstracted example of the first three steps of an interactive Cisco AutoSecure configuration.
Example 2-33 shows an abstracted example of the first three steps of an interactive Cisco AutoSecure configuration.
Router# auto secure
Is this router connected to internet? [no]:y
Enter the number of interfaces facing internet [1]:1
Enter the interface name that is facing internet:Serial0/0/0
Securing Management plane services..

Disabling service finger
Disabling service pad
Disabling udp & tcp small servers
Enabling service password encryption
Enabling service tcp-keepalives-in
Enabling service tcp-keepalives-out
Disabling the cdp protocol
![]() Cisco SDM does not implement all the features of Cisco AutoSecure. As of Cisco SDM Version 2.4, the following Cisco AutoSecure features are not part of the Cisco SDM One-Step Lockdown feature:
Cisco SDM does not implement all the features of Cisco AutoSecure. As of Cisco SDM Version 2.4, the following Cisco AutoSecure features are not part of the Cisco SDM One-Step Lockdown feature:
-
 Disabling NTP: Based on input, Cisco AutoSecure will disable NTP if it is not necessary. Otherwise, NTP will be configured with MD5 authentication. Cisco SDM does not support disabling NTP.
 -
 Configuring AAA: If the AAA service is not configured, Cisco AutoSecure configures local AAA and prompts for the configuration of a local username and password database on the router. Cisco SDM does not support AAA configuration.
 -
 Setting Selective Packet Discard (SPD) values: Cisco SDM does not set SPD values.
 -
 Enabling TCP intercepts: Cisco SDM does not enable TCP intercepts.
 -
 Configuring antispoofing ACLs on outside interfaces: Cisco AutoSecure creates three named access lists to prevent antispoofing source addresses. Cisco SDM does not configure these ACLs.
![]() The following Cisco AutoSecure features are implemented differently in Cisco SDM:
The following Cisco AutoSecure features are implemented differently in Cisco SDM:
-
 Disable SNMP: Cisco SDM will disable SNMP; however, unlike Cisco AutoSecure, Cisco SDM does not provide an option for configuring SNMPv3.
Note  The SNMPv3 option is not available on all routers.
 -
 Enable SSH for access to the router: Cisco SDM will enable and configure SSH on Cisco IOS images that have the IPsec feature set; however, unlike Cisco AutoSecure, Cisco SDM will not enable Secure Copy Protocol (SCP) or disable other access and file transfer services, such as FTP.
Chapter Summary
![]() The following topics were discussed in this chapter:
The following topics were discussed in this chapter:
-
 Routers can be used to secure the perimeters of your networks.
 -
 Cisco SDM can be launched from router memory or from a Windows PC if it has been installed.
 -
 AAA services provide a higher degree of scalability than line-level and privileged EXEC authentication.
 -
 Cisco Secure ACS is a highly scalable, high-performance access control server that supports RADIUS and TACACS+.
 -
 Because OOB management architectures provide higher levels of security and performance than in-band architectures, the decision to use an in-band solution must be carefully considered.
 -
 Many services and interfaces are enabled by default on newly commissioned routers. These services and interfaces are vulnerable to attack and should be secured.
 References
![]() For additional information, refer to these resources:
For additional information, refer to these resources:
-
 Cisco Systems Inc. Integrated Services Routers, http://www.cisco.com/go/isr
 -
 Cisco Systems Inc. Cisco Router and Security Device Manager Introduction, http://www.cisco.com/go/sdm
 -
 Cisco Systems, Inc. Cisco Router and Security Device Manager Quick Start Guide, http://www.cisco.com/en/US/products/sw/secursw/ps5318/products_quick_start09186a0080511c89.html
 -
 Cisco Systems, Inc. SDM Express 2.4 User’s Guide, http://www.cisco.com/en/US/docs/routers/access/cisco_router_and_security_device_manager/24/express/software/user/guide/esugd.html
 -
 Cisco Systems, Inc. Tools & Resources: Software Download Cisco Security Device Manager, http://www.cisco.com/pcgi-bin/tablebuild.pl/sdm
 -
 Cisco Systems, Inc. Cisco Router and Security Device Manager 2.4 User’s Guide 2.4, http://www.cisco.com/en/US/products/sw/secursw/ps5318/products_user_guide_list.html
 -
 Cisco Systems, Inc. Installing Cisco Secure ACS for Windows, http://www.cisco.com/en/US/docs/net_mgmt/cisco_secure_access_control_server_for_windows/4.1/installation/guide/windows/install.html
 -
 Cisco Systems, Inc. Cisco Secure Access Control Server for Windows: Release Notes, http://www.cisco.com/en/US/products/sw/secursw/ps2086/prod_release_notes_list.html
 -
 Carroll, B., Cisco Access Control Security: AAA Administration Services (Cisco Press, 2004)
 -
 Cisco Systems, Inc. Cisco Secure Access Control Server Express: Introduction, http://www.cisco.com/en/US/products/ps8543/index.html
 -
 NTP RFC, http://www.faqs.org/rfcs/rfc1305.html
 -
 SNMP RFC, http://www.ietf.org/rfc/rfc2571.txt
 -
 Wikipedia. Secure Shell, http://en.wikipedia.org/wiki/Secure_Shell
 -
 Halleen, G. and Kellogg, G., Security Monitoring with Cisco Security MARS (Cisco Press, 2007)

1 comments
Bardzo fajnie napisane. Jestem pod wrażeniem i pozdrawiam.
Post a Comment